

Each year, the art teacher and I collaborate on a 3D design and 3D printing project to accompany her art standards in 1st grade. Blokify has been a trusty 3D design tool that has served this project well due to its simplicity on the iPad. However, this year we hit a road block. Blokify is no longer available in the app store, and this was the year that our iPads finally quit supporting its functionality.

I began exploring alternatives. There are so many 3D design apps and web tools out there, but the tricky part is finding one that is developmentally supportive to 1st graders. The app I decided on was Makers Empire. This app has a lot of options for 3D design and also has some gaming built in, but it has a block based design tool called Blocker that works very similar to Blokify. This app is free to use but it’s not free to access the teacher dashboard and be able to download the STL files for 3D printing. It’s also not cheap, so we decided to test it out with a free 14-day trial and see how it served our project.
After tinkering with the app on my own, I decided on some steps it would take to get our 1st graders designing. Makers Empire is not an app you can just open up and start. There’s some setup involved, which I felt like was a bit of a barrier to our 1st graders. Ms. Foretich and I made a slideshow of steps to get students started, and we all sat in front of the screen to do these setup steps together.

First, students tapped on “new” to create new accounts. First, they create a hero. This is their avatar, but we didn’t want to spend much time on this so we just told them to tap each button and make a quick selection.
")
")
")
")
Next, students let Makers Empire assign them a random name and skipped the password step.
")
")
")
Prior to their arrival, I went into the dashboard and setup a class for each 1st grade homeroom. Students were able to select their class, grade, and type their real name so that I could easily identify their account in the teach dashboard.


This finally brought students to the screen where they were ready to create in Blocker.


At this point, we had students turn over their iPads so that they could see the steps needed to create a jewelry pendant for 3D printing. Since Makers Empire has so many things to click on, I really wish we had time for them to tinker first. However, we decided to focus them on a few buttons and promise them that when they finished their design that they could tinker with any of the other parts of the app.


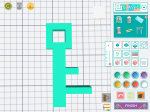
In Blocker, we only needed students to use the add, delete, and view buttons to create their design, so we showed them these 3 buttons. We also talked to them about the requirements for a pendant. It needed to be one level tall. All pieces had to be connected by at least one side. There had to be a hole for string to go through. Students could design a specific shape or something abstract.
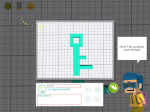
We sent them to tables with iPads and then rotated around to support students with any design questions or confusions they had. Once students were actually in Blocker, most of them had little to no trouble figuring out how to design. When students felt their design was done, they raised a hand for us to come and double check it. Then, they named the file with their name and moved on to tinkering with any part of the app.

Once students left, there were several steps for me to do. I loved that I could log in to the dashboard in Makers Empire and pull up each class, see their files, and download the STL file. This was such an easy step that was so much better than my experience with Blokify. I imported each filed into the Makerware software for our Makerbot and put about 8 files on each plate. On paper, I labeled each plate with student names so I knew which file belonged to which student.
Then, the printing began. Each plate took about an hour to print and there were about 3 plates per class. In all, it took about 12 hours to print the whole first grade’s files across a few days. As each plate printed, I put pendants in individual ziploc bags with the teacher and student name written on the outside.
")
")
")
")
")
When classes were finished printing, Ms. Foretich took the pendants to the art room for the final steps. Students colored their pendants with sharpie markers, placed string through the pendant, and added decorative beads to finalize their jewelry piece.
")
")
")
I loved seeing students wearing their necklaces around the school. They were so proud to show them off to me in the hallways.
Now, Ms. Foretich and I need to think through this tool, how often we might actually use it through the next school year, and whether it’s worth the lofty price tag. If you know of other 3D design tools that might be a good fit for this project and first graders, comment below.
