Students as Teachers: Exploring Text Structure with Flipgrid

text-structure-17

At the beginning of the year, I started talking with Melissa Freeman, 5th grade teacher, about exploring text structure in the library.  The very 1st unit in 5th grade language arts starts with text structure which explores the following standard.

ELAGSE5RI5  Compare and contrast the overall structure (e.g., chronology, comparison, cause/effect, problem/solution) of events,ideas, concepts, or information in two or more texts.

Melissa was wondering how to make the topic more engaging and wondered about the possibility of a library scavenger hunt.  We really weren’t sure where to go with the idea so we kept bouncing around possibilities over email and in person. She even came to the library and worked with me to pull books out of the nonfiction section and start sorting them into stacks.

text-structure-16 text-structure-15

I continued this process so that we knew we had examples of compare/contrast, description, sequence/order, cause/effect, and problem/solution.  Then, I mixed them all up.  We knew that even though we personally picked a book for a specific structure that students might find other examples of text structure within the book.  We were also excited that students would have some one-on-one time looking through some nonfiction books that they might not know that the library has.
text-structure-14 text-structure-13

In one of our brainstorms, I thought about the possibility of students recording their findings in a digital way that could be shared with one another and also other grade levels. I originally thought it would be a good way for them to agree or disagree with examples that were discovered, but we expanded the idea to be a way that students could teach other students in our school and other schools about ways text can be organized.

We decided to use Flipgrid for this task.  I created 5 separate questions: one for each type of text structure.  Then, I linked them all on a Symbaloo that Ms. Freeman could share with her students via Google Classroom.

In class, Ms. Freeman introduced each kind of text structure and students started exploring books on Tumblebooks for each structure.

text-structure-12 text-structure-10

Each class came to the library for a 50-minute session.  We did a quick mini-lesson to review the structures, show how to use Flipgrid, and share what we hoped students would include in their video. This included things like the book title, author, text structure, and a concrete example from the text to justify the structure chosen.  We also setup the idea that these videos could be a teaching tool for the rest of 5th grade, the school, and other schools.

text-structure-8 text-structure-7

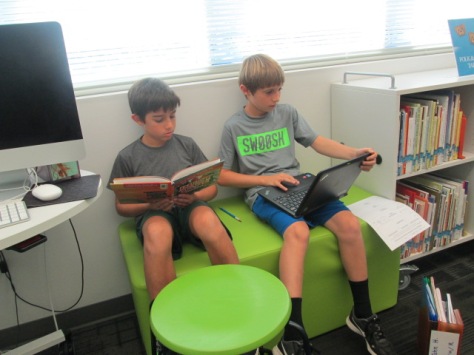
I spread the books out at tables and students worked in partners to browse the tables for a book to start with. As they discovered one of the 5 text structures, they prepared to make a video.  Students used their own computers to record a Flipgrid, and then continued exploring for their next book example.

Ms. Freeman, Ms. Mullins (gifted teacher), and I all walked around and chatted with students as they searched through books.  One of our immediate noticings was that students were guessing the structure simply based on the title, topic, or cover of the book.

They weren’t even opening the book to read the text.  While this was a great predictor of what kind of structure might be inside, students were missing the point about looking at the organization. We clarified this in conferences and adjusted our mini-lesson with each class to put a stronger emphasis on explaining.

To close each class, we showed a few of the videos and had student offer noticings about what they heard. I love that in the new Flipgrid, you can actually respond to each video response.  I showed students how the comments they were making could actually be added right onto our Flipgrid.  I also encouraged each person who made a video to think about how they might add to their original video by posting a new video as a response.

The plan is for students to continue using these Flipgrids in class to post additional examples and respond to one another. We hope that eventually there will be some strong examples that can be shared with other classes in our school as well as with schools we collaborate with.

In the meantime, it’s a work in progress.

text-structure-4 text-structure-3


Mo Willems Seriously Silly Exhibit at the High Museum of Art: Let the Planning Begin

Now through January 10, 2016 you can see an incredible exhibit of artwork by Mo Willems at the High Museum in Atlanta, GA.  As soon as I saw that the exhibit was coming last spring, I shared it with our art teacher, Rita Foretich.  We immediately began talking about a collaborative project and field trip.  She applied for a grant and both of us began thinking about which grade we might target and which standards we could weave in.

On July 11, the High offered an educators day which allowed educators and one guest to get into the museum for free.  This was a perfect time for me to see the exhibit without 100 elementary students and also to start thinking more about our project.  Thank goodness my wife went along so that I could take a moment to see the exhibit without chasing a 3 and 5 year old around.

As soon as we arrived in the parking deck at the High, we began seeing the Pigeon.  He was even in the elevator to the ground level.

And on the revolving doors at the entrance.

Before you even get to the main exhibit, there are some teasers along the way and some great photo opportunities.

You really have to keep your eyes open because there are characters and illustrations hiding everywhere.  Even this aspect could be woven into a field trip.  The museum provides its own scavenger hunt, but I think it would be fun for kids to write down all of the characters that they find along the way or count the number of pigeons they find and write down the locations that they found them in.  Of course, to recognize all of the characters, the kids would need to read all of Mo’s stand alone books and at least one of each of the series books.

The actual exhibit is grouped by series as well as stand alone books.

I loved the wall of ice ream where the Elephant and Piggie illustrations are found.  There’s even a pigeon hiding on this wall just like the end papers of the books.

One of the things that I immediately noticed was the pairs of illustrations that showed a sketch by Mo Willems followed by the final drawing before color was added.  This would be a great process to replicate with students in our project by having them create first, second, ….drafts of their art before drawing the final art.

I also noticed the illustrations from Knuffle Bunny.  The drawings were done without the digital photographs.  I could see this being incorporated into a project on mixed media and layering drawing and digital photographs together.  Having this image to show students can give them an idea of how to imagine the digital photograph in their illustration before adding it.

Of course, the thing that I love most about Mo Willems is how simple his artwork is without being oversimplified.  In Elephant and Piggie, for example, there is very little on the page other than speech bubbles and the characters.  However, each line drawn around the characters, each raised eyebrow, upward looking eye, outstretched arm, etc gives life to the character and reveals the thoughts, emotions, and actions of the characters.  To me, there is great potential in a project around this aspect of Mo Willems.  I could see us studying his artwork very carefully for all of the subtle details that allow us to know a character’s emotions and actions and implement those same ideas into our own characters, stories, or new versions of Mo’s stories.  The exhibit is filled with numerous illustrations to show these details up close.

The exhibit continues in the Greene Family Learning Gallery where you can learn the steps to draw the Pigeon as well as practice drawing him with different emotions.  I snapped a picture of the directions because I plan to incorporate this into either a center in the library or a lesson in our project.

In the learning gallery as well as the exhibit, you can pick up a scavenger hunt to do while you are in the exhibit, but this scavenger hunt could also be used as a way to look closely at the whole body of Mo’s work.

I loved that the gallery included a bus driven by the Pigeon so that you could take a fun picture like this one.

As soon as we get back to school, I’m going to debrief my experience with the art teacher.  We’ll start looking at our own standards as well as the standards of other grade levels and narrow down to which grades, what project, and which standards we will weave together.

Collaborating brings together the expertise of everyone involved.  I love that I can bring my knowledge and observations as a reader and pair it with the art teacher’s expertise in art terminology and technique.  When we put that together with the interests of the kids and the expertise of the grade level teachers, we have a crowdsourced project that is fun, enriching, authentic, supported, and driven.  I can’t wait to see where this project goes this year.

Think about who you could collaborate within your school.  If you’ve never done a project with the art teacher, I recommend it.  I love that a project can flow from the library to the art room to the classroom and back.  Even if you don’t have a big museum exhibit like this near your school, there are endless possibilities when educators work together with students.