Journeying Into Genrefication: Process, Roadblocks, and Community

IMG_8761

Toward the end of last year, I made up my mind that the 2016-17 school year was going to have a big focus on literacy. I of course do a lot with literacy already, but I want to do more. At the close of the year, I talked with my principal about genrefication and the possibility of delaying the opening of our library at the start of the year so that we could get everything organized. To my relief, she was completely on board and even offered ways to support the project.

IMG_8766

I’ve wanted to sort the library by genre for a very long time but just wasn’t sure how to make it happen. I started the process at the end of last year by sorting the fiction section.  Over the summer, I looked at many other libraries who have done this process as well as attended a webinar with Tiffany Whitehead.  During the summer I started listing out my possible genres in nonfiction and everybody.

I also started making a list of materials I would need to get going with the project as soon as we got back to school.  This included blank spine label sheets and ultra aggressive label protectors.  I debated about ordering genre stickers, but there were categories I wanted to make that weren’t available as stickers. I’m terrible at graphic design, but my wife is super talented at it. She agreed to make all of my stickers.  She used Publisher, Open Clip Art, and her own imagination to draw out new labels.

Also during the summer, I met with Courtney Tobin, last year’s library volunteer coordinator, and Janice Flory, this year’s volunteer coordinator, to talk about the genrefication project and the help I would need during preplanning and the first weeks of school.

IMG_8765

Volunteer jobs would be to:

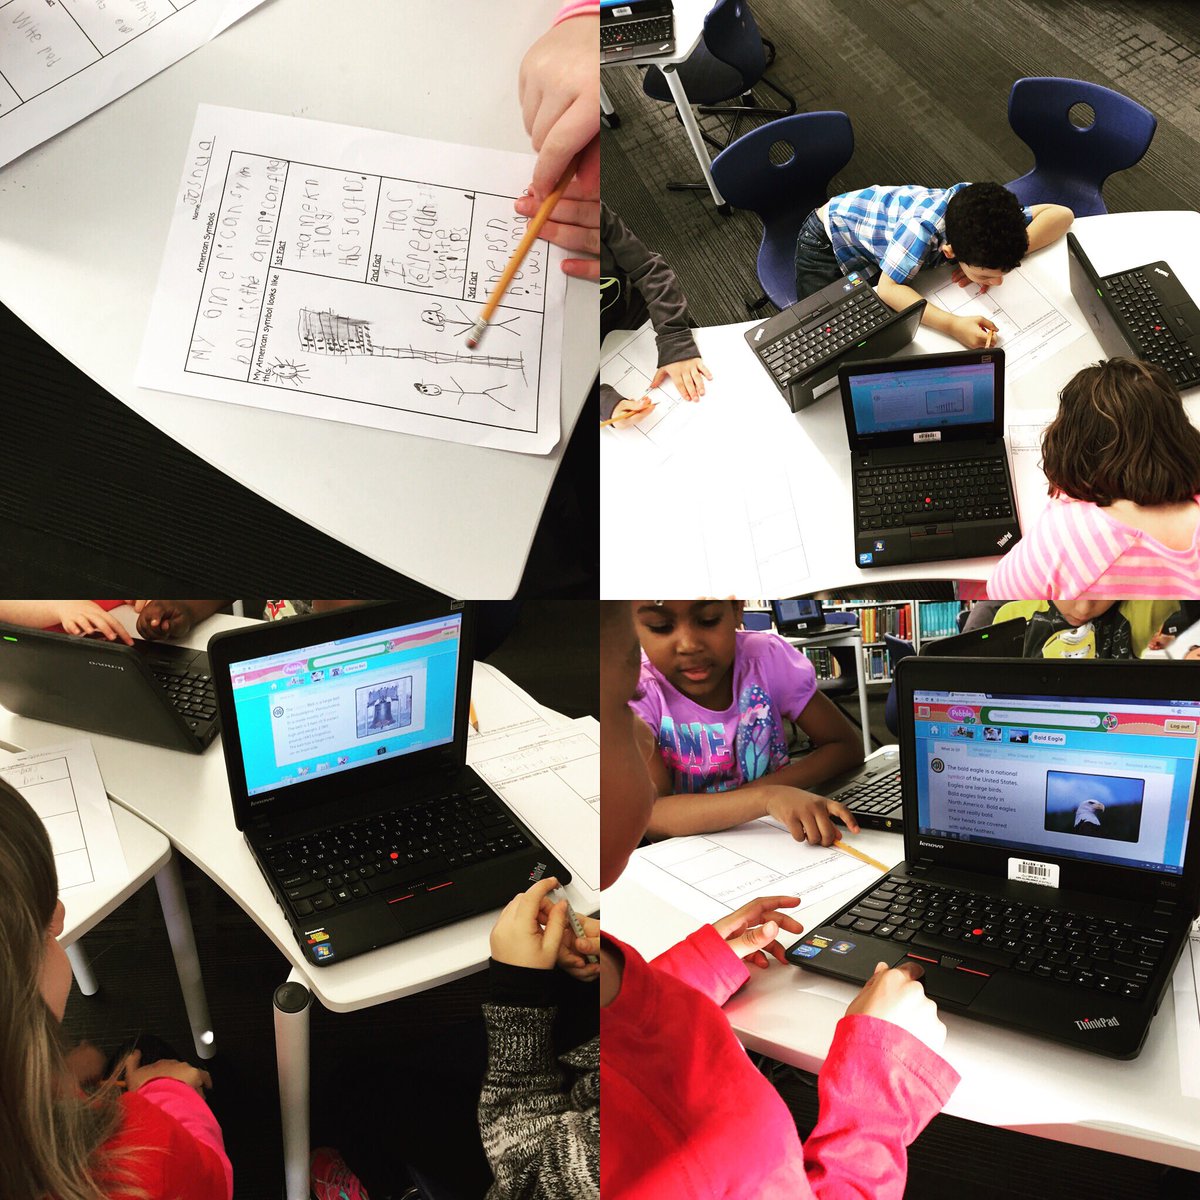
  • Scan books into subcategories in Destiny after I sorted them into stacks
  • Label each book with a new genre sticker above or below the call number depending on space
  • Put the books back into stacks for moving into their new areas

Janice made a Signup Genius for volunteers, and I had between 2-5 volunteers each day during pre-planning and the first week of school.

Since Fiction was already sorted, volunteers started there with scanning and labeling while I continued to sort the Everybody section during pre-planning. Most people know how busy pre-planning is, so the meetings, questions from teachers, and to-do list kept me from keeping ahead of the volunteers. A few of the volunteers felt comfortable assisting me with sorting books, so I released a bit of control to keep moving forward.

IMG_8763

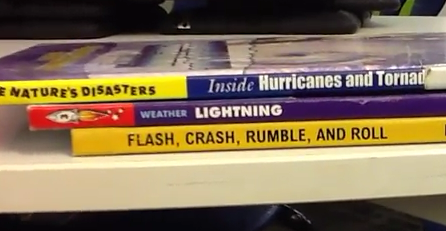
Categories changed throughout the process as we saw needs in the collection. The final categories for Fiction included: humor, scary, sports, realistic, historical, fantasy, science fiction, mystery, and adventure. Picture books included: humor, sports, scary, celebrations & seasons, superhero, princess, animals, favorite authors & characters, school, once upon a time, historical, realistic, and transportation. Nonfiction included: animals, makerspace, biography, careers, cooking & food, all about me, language, native americans, dinosaurs, georgia, math, music, folk & fairy tales, transportation, jokes, space, around the world, poetry, religion, sports, ghosts & mysteries, graphic novel, war & military, fun facts, nature, science, mindset, and history.

The process was pretty much the same every day: sort, scan, label, move.  Miraculous things happened along the way like 4 district support staff showed up and asked how they could help.  While I attended meetings, they scanned most of the Everybody section into categories.

Unnamed image (14)


Families dropped by to see how they could help. Parents and kids worked side by side making decisions and taking ownership of their library.

I learned a lot about the collection and just how disorganized the nonfiction section really was. Each time books of similar topics came together it felt good.

I also suddenly felt free of a sequential order of the books and could really think more about where it made sense to place books in the library. For example, our books related to makerspace were able to move right outside the makerspace door.

We faced some road blocks along the way too.  Some books were scanned into the wrong sublocations. I caught the mistake when a teacher asked for a book and I couldn’t find it in the section it said it was in. Some sections of the Everybody section had to be rescanned. Some volunteers tried to save the library some resources by cutting the label protectors to smaller sizes on the spines. The label immediately started falling off and getting stuck to the books next to them, so we had to go back through, find them, and add an additional label protector on top.

About every 5 minutes, I went back and forth from thinking this was the best idea ever to asking myself what have I done.

My current road block is where to put all of the books.  When every book is here, they don’t fit on the shelves. I know it won’t take long to free up some space, but for now, I’m at least trying to estimate how much shelf space to dedicate to newly established sections with new numbers of books.  Thankfully, the mobile shelves allow me to move things around pretty easily to new spaces, but I still have to move books from one shelf to another trying to figure out the best configuration.  The library looks pretty disorganized because of this.

IMG_8764

Students are getting really excited as they look into the library and see the work going on. Classes are asking how they can come and help. The ultimate question is: “When will the library open?”  I’m hopeful to be done within the next week and we’ll host a grand re-opening orientation for each class.

IMG_8760

I love our community and how they have come together to support this project. Returning volunteers have stepped up, but we’ve seen new families and new volunteers get involved in the project too. A project of this size takes a village. What I thought would take until almost Labor Day has been done is about 3 weeks.  That’s miraculous!


Celebrating Poetry Through Book Spine Poems

book spine poem

One of our favorite kinds of poetry to create each year is book spine poetry. It is a kind of found poetry where the words found on the spines of books create the lines of a poem. Every 2nd grade class came to the library for a one-hour session to create book spine poems individually or in pairs.

To begin our time, I briefly explained found poetry and then told a story about how I created my own book spine poem. The story was meant to serve as a model for how students might craft their own poem, but they certainly didn’t have to go about the process the exact same way as me.

I started in the everybody section of the library and started reading the spines of all the books on the shelf from the beginning. I was looking for a title that jumped out at me as a starting place. I happened upon Quest and Journey by Aaron Becker. I loved how those two words sounded together and I decided to start looking for titles that seemed to go with those two words, which meant looking for titles that were about traveling in some way. I passed by many titles that didn’t fit, so I left them on the shelf without pulling them off. I continued this process until I had found I Took a Walk, In My Dreams I Can Fly, and Goin’ Someplace Special. I also had the book The Ride but I decided that I didn’t like the sound of those words with the others in my stack so I put that book back on the return cart. Next, I tried several ways of arranging the books until I had a sequence I was happy with. After practicing a few times, I recorded my poem with my phone and uploaded it online to share with the world.

After my short story, we went back through the steps and put them into a concise list on the board for students to reference. Then, students got to work. They wandered the shelves looking for that first book and then went from there. As was expected, some of them found their own strategies for creating the poems. Some struggled with finding that first book. Some wanted the support of someone walking with them to look for books. The teacher and I wandered around too and talked with individual students until they started reaching the recording phase.

Once students recorded using an iPad, they brought the iPad to me and we immediately plugged the iPad into my computer and uploaded to Youtube. They also went to the teacher to take a photograph of their book stack that could be printed and put into their poetry books they are creating in class. All books that were used went onto a cart parked in the middle of the library, and students were welcome to read those books while they waited on classmates to finish.

When students finished, I pulled all of their work into Youtube playlists which I emailed to teachers to share with families. We concluded our time by sitting together and snapping for each poem on our playlist. I hope you’ll take a moment to listen to, enjoy, and snap for the poems from each 2nd grade class.

Earth Day Environmental Centers

IMG_0771

Our school is a green school, so we do a lot as a whole school to learn about caring for our Earth throughout the year. Our third grade has some specific science standards that explore pollution and effects of humans on the environment. They are beginning a unit on this during science, and the opportunity aligned to allow us to explore the topic during the week of Earth Day. Each class came to the library for a 45-minute exploration of 5 centers. Students began on the carpet for a quick intro to the 5 centers. Students did not have to make it to all of the centers. Instead, I told them to prioritize which ones interested them the most and do their best to make it to those and save the others in case centers were full or they had extra time.

The classroom teacher, gifted teacher, and I all walked around and talked with individual students as they worked to see what they were discovering and assisting them if they had a question. Here’s a look at the 5 centers they explored:


Center 1: Books

I pulled multiple books from our collection about the environment, energy, recycling, water conservation, and more. Students were encouraged to find a book that caught their eye and spend a few minutes reading parts of that book or parts of several books.

IMG_0766


Center 2: Flipgrid

I created a list of authentic environmental problems that exist in our school. These included things like printing to copiers and never picking up the copies, throwing away recyclables, and trash in our parking lot after a UGA football game. Students were encouraged to pick an issue from my list or come up with their own observation. Using Flipgrid, they recorded a brief video identifying the problem and naming possible solutions.


Center 3: Observation and Poetry

IMG_0768

This center included multiple books by Joyce Sidman. She is a master of making observations in the natural world, researching those observations, and then turning them into poetry. Many of her books feature side-by-side poetry and the information that inspired the poem. Students were encouraged pick a book, find a poem, and see how the factual information that Sidman researched made its way into her poetry.


Center 4: Environmental Blackout Poetry

This center was modeled after the blackout poetry of Austin Kleon. It is  kind of found poetry where you find words in magazines, newspaper, websites, or books to arrange into a poem and you blackout the rest of the words on the page. I copied multiple selections from books about the environment and students chose one of those pages to create a blackout poem. It’s always interesting to see how students boil the words down to the ones that stand out the most in the article or page. This year, I made sure that we did our blackout poetry on top of a table cover so that they black crayon and marker didn’t make its way onto our tables.


Center 5: Environmental Online Resources

Using Symbaloo, I pulled together ebooks, websites, interactive sites, and videos about the environment. Students spent time on a few of the sites before moving on to other centers.

Now the students will use the topics and ideas that they discovered in this exploration as they continue to study these topics back in the classroom.


American Symbol Research in Kindergarten

Students in 2 Kindergarten classes have been hard at work researching American symbols as part of their social studies standards. Doing research projects with the youngest learners in our school doesn’t look like it does in the upper grades. We think about what some of the biggest barriers might be for our young creators and put pieces in places to support students in getting over those barriers.

First, students chose one of four American symbols to research: American flag, statue of liberty, liberty bell, and bald eagle.  In the library, we introduced students to a graphic organizer for collecting 3 facts about their chosen symbol. I learned from another Kindergarten teacher a few years ago during research to set an expectation that allows all students to succeed or exceed during the first research session. We asked students to have a goal of writing at least one fact during the first work session, but if they still had time, they should keep going.

research 1

Students used Capstone’s PebbleGo for their research. We love this database for many reasons but mostly because it breaks information down into manageable pieces and reads the text in a human voice for students. I modeled for students how to listen to a portion of the text and then think about what they had learned by listening. Then, we talked about what we would write on our organizer. This modeling was done with a different American symbol than the one students were researching.

At tables, I setup computers for students to use in pairs. We chose pairs because it gave students one more source of support as they worked. Also at each table, we tried to place an adult for support. The teacher, classroom paraprofessional, and me all worked at tables. If a parent volunteer or student teacher was available, they stayed at the 4th table. Otherwise, the adults took turns checking between tables.  We found that we had to continue modeling for students how to listen, ponder, and then write rather than just copying a sentence off the screen. However, some students still chose a sentence to copy.  All students left with at least one fact but many left with 3 or more.

research 2

After this initial work session, students continued their research in centers in the classroom.  Then, they returned to the library for another work session in small groups. Each group came for 15-20 minutes. We did a short tinkering session with Chatterpix Kids to see how you can take a picture of something, draw a mouth on it, and then record that picture talking. Ahead of time, I chose creative commons images of the symbols for kids to use for their pictures. Rather than having every student create their own Chatterpix, each group created one Chatterpix video with the iPads. Each student chose one fact from their research to read.

Before recording, students chose their fact. We decided the order students would read and practiced a few times. Students helped take the picture of the symbol and draw the mouth. Then, we pressed record and passed the iPad to record. If we needed to record a few times, we did. Then, we uploaded our videos to Youtube and created a playlist to share with the class, families, and you.  I hope you will take a moment to listen to their work.

I love building foundations of research in our early grades and seeing where these students end up by the time they are in 5th grade. We have a lot of work to do, but we celebrate the work of these Kindergarten students and what they have created.

Ms. Lauren’s American Symbols:

Ms. Boyle’s American Symbols:

Flipgrid Rolled Out the Red Carpet for the Barrow Peace Prize

flipgrid peace prize celebration (1)

For the past 2 weeks, people from around the world have been viewing and voting on our 2nd graders’ Barrow Peace Prize project. Across the course of the project, students have:

  • researched one of 6 people from history using PebbleGo, Encyclopedia Britannica, books, and other resources
  • developed criteria for a peace prize
  • written a persuasive piece about why someone should vote for their person from history
  • created a piece of art to accompany their writing
  • recorded their writing using Flipgrid
  • skyped with the creators of PebbleGo to learn about how this important research tool was made

flipgrid peace prize celebration (4)

All of the student work was pulled together onto a Smore so that it could easily be shared with the world, and people voted for the Barrow Peace Prize via a Google form.  Across 2 weeks, the student videos had 3,413 views, 1,161 likes, and visits from over 165 different locations around the world.

A very special ceremony was held at our school to announce the 2016 Barrow Peace Prize winner. We typically Skype with the Flipgrid team to announce he winners, but this year when I called to plan our Skype, I was surprised to learn that the Flipgrid team had much bigger plans for this year’s ceremony.  Charlie Miller and Brad Hosack, the creators of Flipgrid, flew down from Minnesota to join the celebration. They wanted the celebration to be like a mini Academy Awards. They rented a red carpet to roll out at the entrance to the library. They also bought enough pizza and drinks for all the kids, teachers, and families. In addition to the Barrow Peace Prize, we handed out special certificates to students which were chosen by teachers. The Flipgrid team also designed their own 3D printed award and gave it to 5 students chose by the entire Flipgrid team.

flipgrid peace prize celebration (2) flipgrid peace prize celebration (7)

Ahead of the event, the teachers sent out an RSVP invite to families so that we could get an estimate for chairs and pizza. We didn’t tell the kids very much about the ceremony except that they might want to dress up. The teachers all decided that they would dress for the Academy Awards, so I of course had to pull out my tux and red vest for the event.  I printed out all of the certificates to hand to students and shared the doc with the Flipgrid team so that they could announce the winners. The day before the event, Charlie and Brad flew down. They took care of the red carpet, balloons, pizza, and drinks.  Mr. Jordan, our student support technician, and I prepped the library.  When Charlie and Brad arrived, we setup the red carpet with some spotlights and put out the balloons.

The ceremony was the most special ceremony I’ve ever been a part of. The teachers, students, and families entered the library with movie theme music playing and took time to strike a pose on the red carpet for pictures. We also had many other special guests including Carol Williams for the CCSD Board of Education and Gretchen Thomas from UGA.

We connected with the Flipgrid team in Minnesota via Skype so that they could be a part of the entire ceremony. I gave a quick overview of the project for families to hear, and then we launched into awards.  Our awards were presented by two very special Minion guests, since Charlie and Brad weren’t quite ready 🙂

The Flipgrid team gave students all of the statistics of their videos so that they heard the impact that their work was having around the world. Team members took turns announcing student winners in 5 categories, and students came up to receive their awards from the Minions with the help of my wife, Denise Plemmons.

  • Outstanding Opener: For creating an opening statement that hooks your audience into your writing. Congratulations to Daly, Makenzie, Penn, Martavius, and Morgan
  • Prolific Persuader: For using multiple strategies to persuade your audience to vote for your person from history. Congratulations to Joshua, Ben, Kate, Copeland, and Cara.
  • Radical Researcher: For combing through multiple resources to find the most accurate facts to include in your writing. Congratulations to Isobel, KP, Kenderrious, Josie, and Terry
  • Dynamic  Designer: For creating a dynamic image to represent your person from history and engage your audience. Congratulations to Janae, Julian, Tad, Katherine, and Jeffrey
  • Powerful Presenter: For speaking confidently and powerfully as you shared your person from history with the world. Congratulations to Oriana, Ava, JD, Huda, and Blake

The Flipgrid Team handed out their unique 3D printed awards to Eli, Maggie, Iayah, and Zykurea.

The thing that I loved the most is how excited kids were for one another as they received an award. Each winning name brought on a round of cheers and applause almost to the point that we couldn’t hear the next name being read. I love that this project brings students from multiple classrooms together through the common goal of celebrating a person from history. That teamwork that was a part of the entire project, we still evident as we celebrated one another at the ceremony.

Students had a chance to ask the Flipgrid team questions. I always cherish this chance for students to step up to the camera and speak directly to the people who created the tools that they use. Students had such awesome questions such as “How do the videos we record get onto Flipgrid?” and “What are all of the jobs at Flipgrid?” The team took time to fully answer each question in the most personal and age-appropriate way.

Jim Leslie, co-founder of Vidku, talked to the kids about how they were all as much a part of Flipgrid as the people who created it. He stressed the importance of student voice and how much of an impact these students have had on the people who work at Vidku and Flipgrid.

Charlie Miller and Brad Hosack were able to arrive after the Minions left the building. Charlie talked to the kids about how tools like Flipgrid give every person an equal voice. He emphasized to students how many thousands of people had viewed their videos and they are only 7 or 8 years old. He stressed that if you can have that kind of impact at such an early age, then imagine the impact you can have as you grow. The messages shared by Charlie, Brad, Jim, and the whole team are something that I stress to our kids every single day, but it was so powerful for students, teachers, families, board members, and other special guests to be in the same room together hearing this message from a company who truly cares about its users.

flipgrid peace prize celebration (24) flipgrid peace prize celebration (29)

At the very end of our ceremony, we announced the 2016 Barrow Peace Prize. We would like to give a big congratulations to Ruby Bridges for winning the 2016 Barrow Peace Prize. The 18 students who researched her received a copy of a 3D printed medal that was designed by 3 second grade students. Each classroom also received a copy of the medal along with Charlie and Brad of Flipgrid.

Afterward, I had several families come up to me and say that they had no idea what to expect at this ceremony, but they were blown away by the generosity of Flipgrid and the work of the students. So many students were celebrated, and families and students couldn’t help but smile and get excited. We enjoyed celebrating the winning videos by eating pizza. Students returned to their classrooms to watch more of the winning videos, which Brad pulled onto one grid for us.

We can’t thank Charlie, Brad, and all of the Flipgrid and Vidku team for making our 2016 Barrow Peace Prize project the most memorable one so far. You are a company who listens to your users, celebrates their stories, and amplifies the impact students have on the world. Thank you.


Celebrating Reading and Learning Styles with Bookapalooza

bookapalooza (1)

This year, the school library media specialists in our district decided to start a new reading competition called Bookapalooza. In the past, we have participated in Battle of the Books, where students read a set list of books and compete on teams to answer questions about specific details from the books. We had lots of discussion about trying a reading competition that offered students more choice in the books that they read as well as gave students a chance to show off their creativity and interests in a variety of categories rather than just answering factual questions about books.

A subcommittee of our group met to work out some logistics of how a new reading competition might work, and a new Bookapalooza website was created.

Students in 3rd-5th grade could compete in the competition. They could choose any book, author, or genre to read and create a project around. Five categories were created to give students a variety of choices to celebrate their own learning preferences: Art, Performance, Trifold, Writing, and Technology.

In the past, teams of students have worked together in Battle of the Books. Bookapalooza did allow for some collaboration but most projects were meant to be done by individuals. I had to think about organizing our school competition in a whole new way. I’m not sure that I really did the best job, but it definitely was a great first try. In November, I started sharing with students about what Bookapalooza was all about. Some teachers brought their whole class to the library while others just showed a short intro video.

winners (5) winners (8) winners (10) winners (15) winners (12) winners (11)

I created a Google form where students could sign up for Bookapalooza and indicate the category they were most likely going to enter along with the title of the book. This could of course change, but the form allowed me to get a good ideas of how many students were going to enter the contest and to make sure we had projects in all of the 5 categories. I was also able to make an email list from this form so that I could email the participants with updates on the competition.

In the past, I’ve held practices for Battle of the Books during lunch on Tuesdays and Thursdays, but this type of competition really didn’t lend itself to that structure. Instead, I blocked off various times on the library calendar for Bookapalooza help sessions. Teachers could sign students up to come during these times or they were welcome to just drop by to ask questions or work. Some teachers chose to the do the competition with their whole class so they scheduled time on the library calendar specifically for their class.

I also contacted our collaborating teachers to ask if they would help each grade level with projects. Natalie Hicks, Jan Mullins, and Heather Carlson were instrumental in making sure that each grade level had representation in the competition.

As the deadline approached, I checked in via email with students and teachers and the projects started to come in. I cleared off the library shelves for projects to be displayed. As they came in, I numbered the projects for judging.  For digital projects, I created another Google form for students to submit links to projects. I put all of these links on a Google doc that could be displayed on each of our projection boards for viewing. The day after the deadline, we held our school competition, which meant that classes were welcome to come through and look at all of the projects and a team of 5 judges used rubrics to judge and rank the projects. We had to select one project from each category to move on to the district competition at the Athens Clarke County Library.

Some of our technology projects included:

Some of our performance projects included:

Some of our art projects included:

Some of our trifolds included:

Since we had so many outstanding projects, I asked judges to write notes about things that stood out about various projects and we awarded many special certificates and bookmarks to students who didn’t necessarily place “first” in their category.

Congratulations to the following projects for moving forward:

bookapalooza (7)

bookapalooza (13)


Our school level winners moved on to the district competition at the Athens Clarke County library where we were able to enjoy projects from most of the elementary schools in our district. Our school technology project placed 3rd n the district and our school art project placed 1st in the district.  Congratulations to all of the students in Clarke County who took time to share their love of books, their personal talents, and their creativity through numerous Bookapalooza projects.  We look forward to growing this celebration next year.


Preparing and Reflecting on Our Immigration Simulation Via Flipgrid

immigration simulation (1)

Each year, our 5th grade studies immigration and Ellis Island as a part of their social studies standards. For these standards, the teachers work together to prepare students for an Ellis Island simulation experience that takes place across the first half of a school day. A lot of preparation goes into this event, and I’m excited that the library was able to be a part of the project.

immigration simulation (5) immigration simulation (4)

Before the actual simulation, each student was assigned an immigrant to become for the day. They received a folder with a short description of where their person was coming from, what he/she was bringing, and possibly a bit about why this person was traveling to America. This was all prepared by the Social Studies teacher, Ms. Olin.

immigration simulation (10) immigration simulation (8)

The teachers and I shared a Google Doc where we started putting links to sites that we thought would be helpful for students as they researched the immigrant experience for immigrants coming to America from their assigned country. I took these links and made a research Symbaloo for students to use.

In the library, I introduced students to this Symbaloo and they each received their folder from Ms. Olin. The Symbaloo link was shared with all students in Google Classroom so that they could easily find it again. In addition to a few details about the immigrant, the folder contained a graphic organizer with some details that students needed to gather in order to construct a letter of introduction for Ellis Island. Students used the organizer and Symbaloo for an hour in the library and then continued their research in social studies and language arts.

immigration simulation (15) immigration simulation (4)

In writing, students constructed their letters of introduction and Ms. Olin printed a copy of each letter to put in student folders. Students returned to the library a couple of days before the simulation. They had time to finish letters, and when they were ready, they  used Flipgrid to practice reading their letters. In the past, we’ve found that some students were a bit nervous on the day of the simulation or took some time to get into their character. Our hope was that the Flipgrid would give students a chance to get comfortable with their character and practice speaking from that perspective before being thrown into the simulation. The Flipgrid also gave them a chance to listen to one another’s stories and research since they don’t have a lot of time to do that on the simulation day.

Here’s a look at how their practice turned out:

On the day of the simulation students rotated through many experiences to take on the role of an immigrant coming to America. Many dressed in costume, carried props, and practiced talking in an accent. They carried their folders that we had worked on throughout the project. Parent and community volunteers came in to help lead the stations so that students were able to go through health inspections, written tests, and legal inspections. Many were questioned multiple times about their health or documents. Many students were sent away to search for missing pieces of their documentation or were held in quarantine for various reasons.

When students finally passed through all of the experiences, they took an oath and had a meager celebration of bread and cheese. During this time of eating, students once again used Flipgrid. We brought them back into this century and asked them to think about their experience. They didn’t have a script for this. We just wanted their initial reaction after completing the simulation. There are some interesting stories of how it felt to be questioned so much or be detained.  You can see their reactions here.

The addition of Flipgrid this  year really helped to prepare students for the simulation, to learn from one another’s stories, and also for us to hear a student perspective of going through the simulation that we might not normally here. Each student had a chance to share his/her voice and many spoke up when they might not have spoken up in front of the whole class.  I keep thinking of new ways to use Flipgrid in my teaching. I love how versatile it is and want to continue to push the limits of how the tool is used.

Connecting Voices through Robotics: An EdCamp Global Event

This year, our library is fortunate to have a robotics loan from Birdbrain Technologies. We have 12 Finch robots that we are using throughout the year for coding experiences for our students. Currently, a group of 2nd-5th graders are meeting every Friday for one hour to learn to code these robots and create projects with them.

Donna MacDonald (Vermont) and Jenny Lussier (Connecticut) are two wonderful friends who inspire me through my professional learning network, and they also have these robots on loan.  Jenny and Donna wrote their robotics loan application with plans to collaborate with one another, and they have invited my students to jump in to their learning. We recently started talking on Twitter about how our kids could collaborate both synchronously and asynchronously, and we were looped in to a conversation about EdCamp Global.

I wish I had clued in to EdCamp Global sooner because it was an amazing opportunity.  Across 24 hours over 51 countries and more than 800 classrooms empowered students’ and teachers’ voices in multiple online formats. Not only did voices from around the globe come together but there was also a true global audience to watch the work happen. I definitely want to do more with this the next time around.

Thanks to Donna and Jenny’s enthusiastic energy, we pulled together a session on the EdCamp Global schedule to allow our students to share.  Jenny got the application in, setup the Google Hangout, and got everything up and running for us. Donna created a Google doc of resources for the session and started advertising our session on social media.

On the morning of the hangout, I was able to pull a couple of my Friday students from their classrooms to join the hangout and Jenny & Donna both had classes of students rotate through their libraries.  Across the 1-hour session, we talked about the Finch loan program and how we got started. We also talked about other robotics tools that we are using in our schools such as Sphero, BB-8, Dash and Dot, and Ollie.

My favorite part was when students took turns sharing their experience with robotics.  My two students showed programs that they were working on within Level 1 of Snap!  Donna and Jenny’s students also told stories of challenges they had faced with the robots, things they had figured out, and plans for what they hoped to do over the next few weeks.


Tweets during:

Toward the end of our time, Jenny had her students start experimenting with Scratch and Finch. They had just enough time to come over and demonstrate what they figured out during the hangout.  I can’t wait to share what we learned with the rest of our 2nd-5th graders so we can continue to explore programming the Finch.

Donna created a Padlet where we can post challenges to one another.

Jenny created a Flipgrid where students can share video challenges or tips about the Finch robots.

I think it is just incredible how students in multiple locations can come together to collaborate in real time when our schedule allows, and that we can continue to collaborate even when we aren’t meeting together at the same time.  My group is just getting started, so I can’t wait to see what we learn from Jenny and Donna’s students and what we are able to contribute along the way too!

Beginning the Barrow Peace Prize: A Flipgrid Project

peace prize research (5)

Each year, our 2nd grade takes on a big research project that has evolved into a project called the Barrow Peace Prize. Students research one of six people from black history, write a persuasive piece convincing people to vote for their person to win, and record their writing using Flipgrid. These videos are shared with the world along with a Google forms voting ballot. We celebrate the winner with the Flipgrid team via Skype.

peace prize research (9)

This year’s project is off to a great start, and I’m amazed by what these 2nd graders are doing with their technology, especially since they aren’t 1:1 in their classes.  With fewer devices to practice on, it takes these students a bit longer to navigate tools on the computer.

peace prize research (8)

To start, each student chose one of six people: Langston Hughes, Wilma Rudolph, Bessie Coleman, Jesse Owens, Charles Drew, and Ruby Bridges. Using Google Classroom, each teacher shared a Google doc graphic organizer with students. In the library, students brought class computers and I provided additional computers so each student had one. We did a review of how to login to Google and navigate to Classroom to get the doc. I also showed students how to click between tabs in Chrome, how to copy and paste facts, and where to look for information.

peace prize research (7)

Students started in 2 resources: PebbleGo and Encyclopedia Britannica. I love these sites because they have great information and both will read the content to students who need that extra support. I debated about teaching students how to copy and paste because I don’t want to set students up for just copying. However, we wanted students to have access to a collection of the best facts when they prepared to do their writing without having to weed through all of the articles. The writing workshop time would be the time to focus on taking those copied facts and put them into students’ own words.

peace prize research (6)

We did 3 hour-long sessions of research. Each session we saw students get more proficient at navigating the technology, and even in the frustration we faced, I reminded myself and the teachers to step back and really look at what 7-year olds were doing. Students were logging into email, accessing Google Classroom, finding a Google doc, visiting multiple resources, using ctrl C and ctrl V, keeping track of where facts came from, and leaning to use the research tool in a Google Doc. This list could definitely be added to because there was a lot more.

Once facts were gathered, teachers began writing workshops in their classrooms for students to start writing scripts for their videos. Prior to this, we held a Google Hangout where all classes tuned in from classrooms. The purpose of this was to establish a list of character traits that someone who is deserving of the Barrow Peace Prize might represent. We read about Alfred Nobel and looked at Malala and why she represented peace. Then, classes added to a Google Doc to create a list of these character traits. This list was displayed during writing times for all students to consider in their writing.

Now, students are continuing to fine tune their writing before recording takes place.  We can’t wait to share the videos with our school, families, and classrooms around the world.  Be on the lookout for a post in the next couple of weeks inviting you to view and vote for the 2016 Barrow Peace Prize.

peace prize research (2)

Using Makerspace to Extend Curriculum: A Geology Project

tinkercad rock walls (12)

Third grade studies rocks and minerals as a part of their science standards. In Ms. Hicks class, they have been extending their research of rocks and minerals to create their own Blendspace lessons to teach others facts about rocks and minerals. They are even including pre-tests and post-tests in their lessons. As a part of this Blendspace project, students started thinking about how they might design their own climbing wall for our school based on their research.

tinkercad rock walls (11)

Ms. Hicks asked me what tool we might use to design and prototype of a climbing wall, and I immediately thought of Tinkercad. We have used Tinkercad for other projects and have found it to be one of the better tools for 3d design at the elementary level. Students came to the library to learn a bit about how Tinkercad works.

tinkercad rock walls (10)

I gave them a very quick tutorial which basically showed them things like adding a work plane, dragging over geometric shapes, resizing shapes, and building up.

tinkercad rock walls (8)

I created two generic accounts that students share rather than creating an account for every student. Half of them logged in with one account and half with the other. Their goal was to tinker during the first lesson to see what they could figure out, but their tinkering was a bit more focused than usual. Ms. Hicks really wanted them to already start envisioning their climbing wall as they were tinkering. Some of them latched onto the tool and really got a jumpstart on designing, while others tried something and started over several times.

tinkercad rock walls (7)

One student thought we was being a bit silly by trying to design a chicken instead of a climbing wall, but we turned this into a learning opportunity. I thought about the climbing wall that is at our own Omni Club here in Athens. It is shaped like a giant bulldog, so I pulled it up on the screen to show that he could in fact design his rock all to look like a chicken if he really thought about how people would climb a giant chicken. Instead of shutting him down, his wheels were turning about what he might try, and he is in fact now designing a penguin rock wall.

Other students started thinking about which rocks and minerals would be the best choices for the climbing wall based on their strength and also their color. They referenced their research and the Mohs hardness scale to choose rocks and minerals that would hold up a climber. As they did this, they changed the colors and shapes of the climbing pieces on their walls to represent their different choices. Not all students were ready for this level of thinking, but when we found students who were thinking in this way, we encouraged them to share what they were doing in the hopes of giving other students ideas.


One student even let me record a snippet of his thinking about his own rock wall choices.

The students have worked on these designs for 3 work sessions. As they finish, they are taking screen shots of their designs and adding them to Blendspace with an explanation of their design. In the future, we plan to export their designs as .stl files so that we can actually 3d print their prototypes when they are ready to present.

tinkercad rock walls (1)

I loved this real world application of rocks and minerals because it showed students that there are actually careers where you might consider some of the facts that they are learning in science. There was so much higher order thinking built into this project, especially this design piece. I had some great conversation with students as they referenced their research to find the specific rocks and minerals they wanted to use. One conversation involved a student specifically wanting a rock that was yellow. He kept Googling different rocks he knew to see if they came in yellow. When he finally found one of the feldspar family that was yellow, he noticed that the website description referenced Bob’s Rock Shop. We had a great conversation about the importance of digging into the website to really see where the information was coming from, and he found that the information actually did come from a reliable source within that site.

tinkercad rock walls (6)

I hope that we can find ways to share the work that this class is doing in the hopes of inspiring students at all levels to apply what they are doing to really world experiences. It would be fascinating to actually see this climbing wall come to life and have o