Rubiks Cube Mosaic Makerspace

Rubiks Cube Makerspace (34)

We love trying new things in our makerspace, so this February we decided to leap into Rubiks cubes. At AASL in Louisville, I visited the You Can Do the Cube booth and checked out their Rubiks cube lending program. You can check out sets of Rubiks cubes to create Rubiks cubes mosaics and simply pay for the shipping and handling each way.

Rubiks Cube Makerspace (19)

I shared this idea for our makerspace with Gretchen Thomas at UGA and she was excited to give it a try.  We collaborate with Gretchen and her students every Tuesday and Thursday in our open makerspace time. Instead of waiting on an available kit in the lending program, she decided she could use some funds to purchase some inexpensive cubes on Amazon. She ordered 120 3×3 cubes and 50 2×2 cubes.

Rubiks Cube Makerspace (29)

In class at UGA, Gretchen’s students watched multiple videos on how to solve Rubiks cubes and worked to learn some strategies that would be helpful to our Barrow students. They also practiced designing their own small mosaics using the 3×3 cubes.

Rubiks Cube Makerspace (32)

At Barrow, we selected some prepared mosaics from the You Can Do the Cube site. We chose Rosa Parks for our 3×3 and a flower for our 2×2. I measured out a grid on a piece of butcher paper and taped the individual mosaic pieces into the grid and numbered them.  I made a second set of pieces that we numbered and cut out and put into an envelope. Students could select a picture out of the envelope, solve that picture, and place it onto the correct square in the grid.

For our open makerspace, teachers sign up students for a 30-minute slot on a Google document. They are signing up for all 6 Tuesday/Thursday sessions of Rubiks Cube. For this first session, students spent time exploring the cubes.  I made a QR code for students to scan to watch tutorial videos about solving. Some followed these videos, while others learned from the strategies of friends and UGA students.

Rubiks Cube Makerspace (33)

It was amazing to see how many students already knew some tips about solving Rubiks cubes because of their own practicing at home.  We also downloaded an app on the iPads called Cube Solver that allows you to put in the colors on the cube and it shows you all the steps to solve the entire cube. Some students used this as a tool for learning more about the different turns required to solve.

Once students felt comfortable with the cube, they started solving actual pieces of the mosaic and adding it to our grid located on a large table in the back corner of the library. With so many students working on cubes during one makerspace and with so many students already talented in solving cubes, the mosaic started to take shape pretty quickly. By the end of the 2nd day of working on the mosaics, we had the Rosa Parks and flower mosaic done.

I had already prepared additional mosaics to work on: a dinosaur and Mona Lisa.  We celebrated our achievement of solving the first mosaics and took some pictures. Then, it was time to start dismantling the mosaics and solving a new one.

Once we created 2 additional mosaics, I gave the students the option of designing their own small mosaics.  They could do this alone or with a group.  They sketched out their mosaic on grid paper first and then worked to solve and assemble the mosaic at tables.  This would be a great way to extend this experience in future sessions because there wasn’t much time left.

The thing I loved most about this makerspace project was being able to see students bringing in a talent and passion they had outside of school and making it something for school.  There are lots of ways this could be incorporated into grade level curriculum so I hope that this is not the end of the Rubiks cube. We have so many students who enjoyed this that I’m sure we could even just make this a center in the library for people to work on over time.

Book Character Costumes on Parade: Our February Makerspace

Each year, we hold a Storybook Parade to celebrate our favorite books. This is a long-standing tradition at our school. Students choose a favorite book, dress up as that character, and parade down the sidewalks near our school to advertise their books to the community.

Classroom teachers do a wonderful job of supporting students in making costumes if they are unable to do that at home, but this year, I thought our February makerspace theme could be about costumes so that students could get a jump start on preparing for the parade.

Ahead of makerspace, Gretchen Thomas had her UGA students practice making their own costume pieces based on book characters to get warmed up. I made an introduction video for February’s costume theme and a Google doc signup for teachers to signup students at 11, 11:30, and 12:00 on Tuesdays & Thursdays.

I also went through our makerspace and gathered possible materials that students might use for costumes: felt, fabric scraps, yarn, cardboard, plastic tablecloths, various glue, pom poms, beads, and more.

I pulled several costume and fashion books from our makerspace genre section of the library as well as a few possible examples of books that could become character costumes.

When students signed up, they were signing up for a 3-week session on costume making to meet on Tuesdays & Thursdays. If students finished early, they could take their name off the list to allow others to come, but if they needed all 3 weeks, they could come. Each week, a different group of UGA students came to support our makers in grades 1-5.

During week 1, I met with all students on the carpet to set the stage for our time together. We looked at past storybook parade photos to see the wide variety of costumes people had. I also held up some of the picture books I had pulled and we brainstormed together some possible costume pieces that could be made for each character as well as what we could use that might already be in our closets.

At our tables, I put paper and pencils for students to do some planning as well as all of our costume/fashion books for ideas. Our goal was for each student to have a costume idea before gathering materials from the material table. From past experience, we’ve seen students just grab everything they see because they like it rather than think about what they truly need. We wanted students to be conscious of our makerspace materials and not creating excess waste.

As students gathered their materials with help from our UGA students, they spread out in the library at tables to start working. It took a lot of energy from all adults in the room because every student was creating something completely different. However, it was amazing to look around and see the collaborative creativity between our young makers and our UGA helpers. Many hidden talents and problem solving skills began to emerge.

We watched as cardboard became hats, ladybug wings, ninja swords, and candy bars.

Plastic tablecloths became dresses, skirts, and shirts.

Scraps of fabric were tied together into ninja clothes.

Felt and construction paper became cheetah spots and Little Elliot polka dots.

Cardstock, construction paper, and pipe cleaners became masks.

We all learned how to be resourceful with the materials we had and all worked together to figure out how to be costume designers with limited experience.

With so many works-in-progress, our storage room is a bit of a mess. We have costume pieces drying and stored on every shelf, table, and corner. As students return each day, they locate their own items with assistance from adults and continue the process. Students are allowed to take their costume pieces home, but I’m encouraging them to keep them here at school until our parade on March 8th so that they don’t get lost.

This was our first try at a costume making makerspace. It could use some fine tuning. It’s always a challenge to have so many different projects going at once where every student needs different materials and skill sets to create. However, our extra hands from UGA helps this part a lot. I would love to have a better plan for getting students started and gathering the materials that they each need.  Maybe each student needs a box or a tray where they could keep their items. Then these could be stacked on top of one another. I’m not sure, but I would love to debrief the experience with our students and the UGA students to get ideas for next year.

We can’t wait to see these costumes on parade very soon!


Weaving Together Social Studies and Makerspace

inventors-24Our 5th grade is currently studying the impact on American life that several famous inventors had. When I was brainstorming with Shelley Olin, 5th grade social studies teacher, we began to wonder about connections these standards had to makerspace.  It started as an idea seed and grew into a set of experiences for all 5th graders to engage in.

I wanted students to put themselves into the shoes of an inventor so that they could begin to understand the perseverance and curiosity that inventors have. We focused on 3 of the inventors: Thomas Edison (electricity), Alexander Graham Bell (communication), and the Wright Brothers (flight).

I prepared 3 centers on electricity, communication, and flight.  Each center included a biography about the inventors, instructions for an activity, and a clipboard to leave wisdom for the next group to learn from.

For flight, I selected some paper airplanes that could be made from a full sheet of paper.  I also included books about other paper airplanes.

For communication, I created 2 choices.  One was to use littlebits to create a tool for communicating using Morse code. I included a buzzer and LED bit as well as button, pulse sensor, and slide dimmer bits.  The other experience was to create a tin can phone.  I provided coffee cans and cups and various kinds of string.

For electricity, I copied instructions for making a simple paper circuit using a coin battery, led light, and copper tape.  I put materials in Ziploc bags so each group would have what they needed to create a circuit.  I added extra led lights for tinkering beyond an simple circuit.

It took a long time to prepare all of the materials for 3 back-to-back 5th grade classes.  I had to have everything ready for an immediate turn round between classes.

Before coming to the library to engage in some makerspace activities related to these themes, students read about each inventor in textbooks and on PebbleGo.  They gave Ms. Olin their top 2 interests out of the 3 themes so that she could put them in groups.

inventors-22

In the library, we started by looking at the littlebits invention cycle.  There’s not just one place to start in the cycle and it doesn’t necessarily follow a linear sequence.  We talked about how students could start with “create” by following the directions that I had given. Then they could play with their creation and begin to remix ideas to create an improved version or an alternative invention.  By the end, I hoped that they would have something to share with the rest of their class or group.  It really seemed like it could be linear in talking about it, but I quickly saw that it is very fluid.

After our quick intro, students sorted into their chosen task and got to work. Luckily, Ms. Olin and other collaborative teachers joined the class during this session. At times, we had me and 3 teachers supporting students around the library.  It was 3 very different activities, so having the extra support was beneficial.

What I quickly saw was how much students wanted to just jump in and put things together without reading directions.  At paper airplanes, students started folding paper in all sorts of folds and testing them out.

inventors-25

At paper circuits, students were sticking down tape and connecting the led to the battery without reading  the instructions or even formulating a plan.

inventors-1

At tin can phones, students immediately started connecting cans.

inventors-3

But…as I stepped back and thought about it, isn’t that really what inventors do?  They don’t necessarily have a set of instructions to follow. They just try things out to see what happens.

After some initial tinkering, several students did in fact try to read the instructions and many said that they wished they had read them at the beginning. It was an important lesson that we talked about and learned from. It’s hard to read all the instructions before putting something together when all you want is to see the finished product.  I do that myself as an adult.

inventors-17

One thing that was really interesting was when students finished their first prototype and they started remixing. One example at the tin can phone center was when 2 groups decided to combine their two phones and see if they could make a four-way call.

inventors-26

At the paper airplane center, students started combining their planes together to see if a combination would create a better flying plane.  They were truly embracing the idea of remixing.

inventors-20

When we came back together at the end, I asked students to think about what it was like to be an inventor.  We had some great conversation about perseverance, staying calm through frustration, trying again, problem solving, and taking plenty of time to invent. We circled back to our inventors and considered how much time, frustration, and perseverance they each put into their inventions.  I think the experience gave the students a greater appreciation for the inventors they were learning about rather than just passively reading about them.

inventors-14

We even had a moment to talk about continuing inventions in our makerspace or at home and entering them into our school maker faire coming soon.  I loved how a simple idea from a social studies standard was able to weave together growth mindset, literature, social studies, and makerspace all into one experience.


The Makerspace Is Open with a New Badging System

img_8887UGA is back in session which means our makerspace is cranking up again.  We already have some curriculum connections planned for special projects, but our students look forward to the weekly open makerspace times on Tuesdays and Thursdays from 11-12:30.

Gretchen Thomas and her UGA class collaborate with us to provide a weekly time where students can signup to explore various tools and projects in our makerspace.  Four UGA students come each time and lead up to 15 students every 30 minutes in the makerspace so that I can also teach classes at the same time.

img_8875

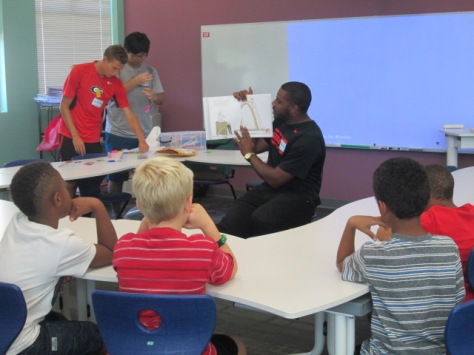
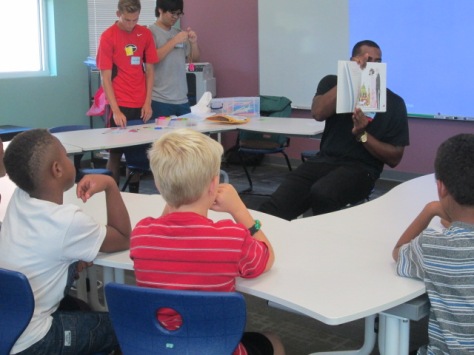
Gretchen and I are have learned a lot during our collaboration together, and I love that she’s always pushing her class to try something new.  For our first few sessions this year, the UGA students are presenting a maker-related book to the students and an activity to accompany that book.  There’s not really enough time to read the entire book and still make something, but they at least are able to show the book, talk a bit about it, and then make something with the students.

img_8874

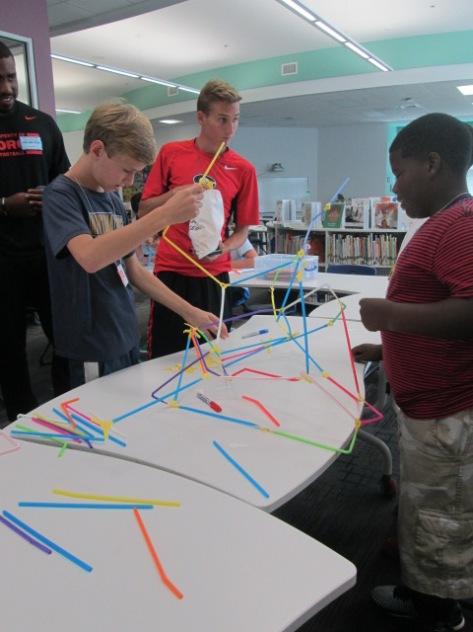
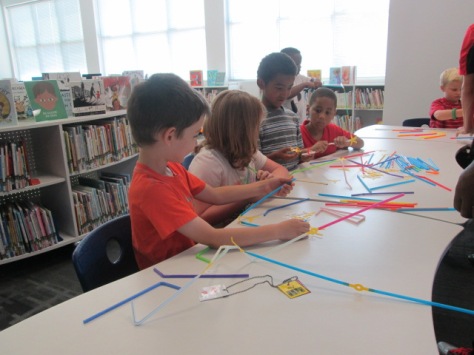
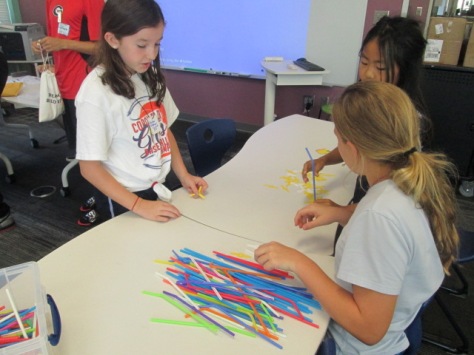
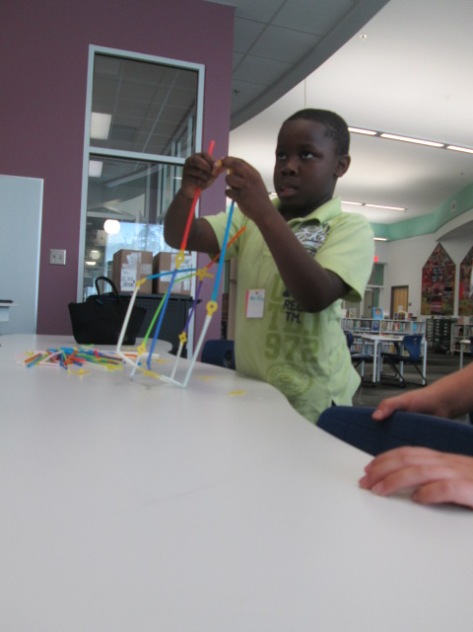
For our first session, the UGA students read or showed Iggy Peck Architect.  At the end of the book, they invited our students in 1st, 3rd, 4th, and 5th grades to become an architect and use Strawbees to build the tallest free standing tower.

img_8873

I loved watching the UGA students decide how much information to give the students versus when to let them discover things on their own.  In one group, they just gave them the Strawbees and straws and said “build”.

Then, in another group they gave some examples of how the straws and Strawbees could connect to one another.  The amount of guidance definitely impacted the type of structures made.

img_8881

I don’t know that we have a firm answer on how much structure to offer to the students, but I’m glad that we are always thinking about how much is too much.  I think we certainly stayed conservative on how much we told the students.  Every structure was different and students found things that worked really well and things that failed miserably.  In the end, the important thing is that we really didn’t have students who gave up or who even got extremely upset because they didn’t “win”.  That’s the true spirit of making.

img_8895

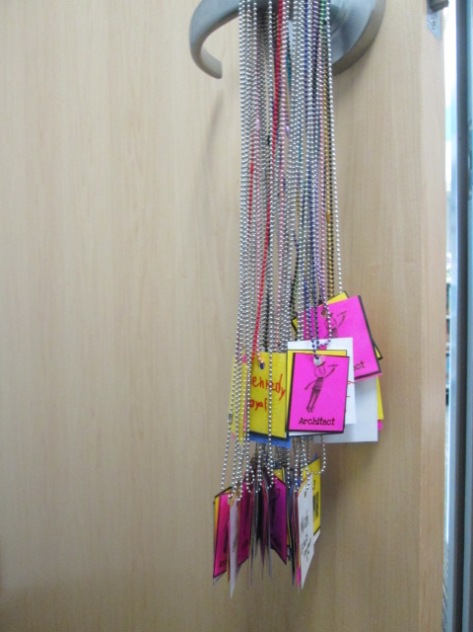
One new addition this year is something we’ve talked about for a long time.  So many students come to the makerspace, that it’s hard to track who has learned what tool or skill.  I really wanted a badging system but didn’t think I had time to make it.  Gretchen and I have talked through this many times and discussed the idea of badges for specific tools like Sphero, Duct Tape, LittleBits, etc and badges for skills such as problem-solver, thinking outside the box, teamwork, etc.

Gretchen took it upon herself to make this happen for us.  She started making badges that students would attach to chain necklaces.  Students would earn a badge for the tool they explored and the group they worked with as well as have an opportunity to earn rare badges for skills or qualities.  Gretchen and her students will continue to design badges and add them to the collection.  They will be stored in plastic drawers in the makerspace.  Students will hang their necklaces on a hook in the space and grab them when they come to makerspace.

img_8896

We’ll easily be able to look at badges and see which students have learned which tools and which students have demonstrated the skills of a maker.

I can’t wait to see where this goes, and I’m so thankful for Gretchen and her class making this happen!

Making Something New: A Makerspace Activity

coconut makerspace (13)

Recently, the Children’s Theatre Troup directed by Kelsey Brown presented “Another Kid’s Treasure Island” at the State Botanical Garden of Georgia. This play also featured a makerspace activity for attendees to use a variety of objects to make something new.

Gretchen Thomas and her UGA students helped pack hundreds of plastic coconuts with craft supplies to support the play, but several coconuts were left over. Our makerspace was fortunate enough to acquire these leftover coconuts for students to explore.

coconut makerspace (14)

This week, we’ve been reading The Most Magnificent Thing by Ashley Spires. I love the message that this book shares about perseverance and creativity. The character in the book tries multiple ways to make the thing she has in her head, but she just can’t get it quite right. At first, she easily starts over, but as time goes on, she gets pretty frustrated. However, even then, she goes on a walk to clear her mind. While reading the story, we paused along the way to setup some steps for “making”.

  • Have an initial plan after you gather your supplies
  • Try to make something
  • Take a look at what you’ve made and try again if needed
  • If something isn’t working, try to do it in a different way
  • If you start to feel frustrated, take a break or a walk, and come back
  • Don’t quit

We could keep adding to this list, but those were the basic principles we followed.

coconut makerspace (12)


I showed students one of the plastic coconuts filled with supplies and told them that their goal was to take the materials and make something new. We talked about how the girl in the story made something she could actually use, so they certainly could try to make something like a piece of jewelry, a hat, a container for rocks, or whatever else they wanted.

coconut makerspace (6) coconut makerspace (1)

I also put out some scissors, glue, crayons, and markers. Then, students got to work. Each student had a different strategy for how to work. Some got very frustrated and did indeed take a walk around the library. Some students collaborated with people at their table or traded supplies with a friend.  It was loud and messy, but I heard things from students like:

  • Is makerspace always this fun?
  • Do we really get to keep the things that we made?
  • When can I come back?
  • From a teacher: My students talked about what they did with you the whole next day.

coconut makerspace (2) coconut makerspace (4)

You could look at this and say….sure….this is just making a craft, but there’s really so much more there.

Perseverance, problem solving, creativity, inventing, collaboration, and more were all there. Thank you to Gretchen Thomas for giving us an opportunity to bring makerspace to some of our grades who haven’t had a chance to use our makerspace quite as much. We have a lot of new students excited about finding more opportunities to use the tools in our makerspace because of this opportunity.

Hour of Code 2015 is Here!

Hour of Code Day 1 (11)

We have been participating in Hour of Code since it started 3 years ago, and it is an event that inspires so many things within our school.  This week-long event coincides with Computer Science in Education week each December.  Code.org partner with numerous organizations to offer one-hour tutorials that are appropriate for multiple age groups.  When we first started Hour of Code, I tried to get students to all try specific tutorials, but many of our students have gained some confidence with coding and problem solving over the years.  I wanted to offer more choice this year and continue to focus on perseverance, problem solving, and collaboration in addition to learning some pieces of what it means to code.

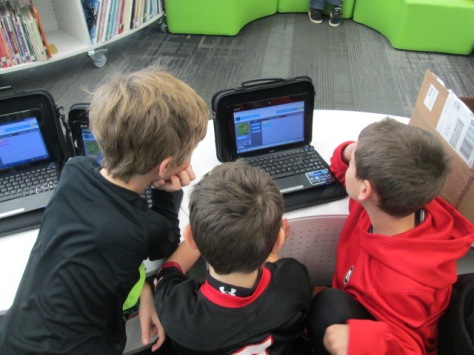
On day 1 of Hour of Code, our 3rd grade came 2 classes at a time.  This meant 45-50 students in the library with their computers.  It’s a big group with lots of energy, but it amazes me how they settle in, don’t give up, and support one another.  I also had a 5th grade group and a second grade group during the day.

We started by sharing some things we know about coding.  We also talked about how many of us love video games or apps.  Pretty much all hands went up, and we pondered the questions: “What if the people who invented Minecraft (or insert any app or game here) gave up before they finished the game?”  We also pondered how many games are currently being invented out there that we don’t even know about and how many of the developers will persevere or give up.  It was an interesting way to set the stage for our work for the day.

We watched the official Hour of Code video.

Then, I showed students the Hour of Code website and the 4 main tutorials that were featured: Star Wars, Minecraft, Frozen, and Angry Birds.

I offered these as a starting place, but students were allowed to go to any tutorial they wanted to attempt.  My main rule was that I wanted them to really stick with whatever they picked and give their best try.

Students spread out around the library and got to work.  It took a few minutes to settle in, but all students stayed focused on the Code.org site.  I loved how they very naturally got up and helped one another when they got stuck.  A few students reached a point of frustration where they needed a break, so I pulled all of our coding books from the library as a place to go and take a break to just read about coding until they were ready to go back to work.  At some point, they all went back to their computer.

Hour of Code Day 1 (1)

I also loved that some students who speak other languages saw that they could switch the language on the Code.org tutorials.  Rather than flipping back and forth to Google Translate, they could read the site right on their screen, and these students were over the moon with excitement and were extremely successful in their coding.

The Code.org site was very reliable on our first day.  In the previous 2 years, we’ve had problems with the site crashing or being slow, but day one went really well.  I had some backup plans though.  One of the other activities that students were able to do in small groups was visit our Finch robots, which are on loan from Birdbrain Technologies.  Students worked alone to use Snap to program the robot to maneuver around the floor.  There wasn’t a specific task other than to explore what the robots could do and what each block of code meant.  Some students had the robots congregating together on the floor or even doing a dance together.  It was fun to see what they came up with in such a short amount of time.

As usual, teachers observed students who struggled in academic areas suddenly find a spark with coding.  I hope that seeing some of these students’ excitement will spark ideas for all of us in how we might use this momentum to connect to curriculum content.  We can’t dismiss the tools that get students excited about learning.  We need to embrace tools like Minecraft and the expertise that our students hold in these tools and consider how these might enrich the work we are doing together in school.

I can’t wait to see what else the Hour of Code week holds for us.

2014 Student Book Budgets: Real-World Math Lessons from Capstone Press

decisions (1)Each year, I dedicate a portion of library funding for students to control.  Since the library is for all of our school community, I feel strongly that students should have a voice in what goes into the collection.  Here’s what has happened so far:

  • Students developed a Google form survey and surveyed most of the school on their reading interests
  • Students analyzed the results and developed a list of goals to focus on which included sports, graphic novels, humor, scary, world records, and action/adventure.
  • Students met with Jim Boon from Capstone Press and Gret Hechenbleikner from Gumdrop books to look at book samples and catalogs.

decisions (8)Since the visit with the vendors, the student book budget group has been coming into the library on Mondays and Wednesdays during their recess to continue looking at catalogs.  Much of what they wanted was in Capstone’s catalog, so their first step was to finalize what they wanted to order from Gumdrop.  They decided on a Ripley’s Believe It or Not series, a how to draw graphic novel series, a graphic mythical heroes series, and a history’s most haunted series.

decisions (2)When that was done, I hooked up the scanner to my computer and gave all of the students a Capstone catalog.  Capstone has a great feature where there is a barcode next to each set of books in the catalog.  You can scan the set straight into your cart, or you can scan the set and select the books that you want.  As students found books that matched our goals, they scanned the barcode and told me which books to add.  At that point, we didn’t worry about cost.  We wanted to add all of the books that we were interested in and then start narrowing.  This adding process was so smooth thanks to this scanning feature.  In the past, students have circled items in catalogs, written on pieces of paper, etc. and it took a lot of time to compile everything.  I loved that we were all adding to the same list as we worked.

decisions (6)Right now, Capstone is offering an incentive like they often do.  If you spend at least $1750, you get 30% back in Capstone Rewards.  If you spend less that $1750, you only get 10%.  This was a great math discussion.  Our original budget was $1500 for all of the book budgets.  However, if we spend just $250 more with Capstone, then we get $525 in free books.  I’ve really pushed the group to think about budget, but this was a great real-world example where you sometimes have to spend beyond your budget if it helps you in the long run.  The students unanimously agreed that we needed to spend the $1750 since we already had well beyond that amount in our wish list cart.  I pulled out all of the numbers that I had to think about in order to make this happen.  We looked at the remaining dollar amount in our district budget which was about $375.  Then, we looked at the remaining balance in our local account, which holds profits from our book fairs along with any donations we receive.  I told them about remaining expenses that I knew about for the year such as battle of the books.  We agreed that there was enough money to purchase our list from Gum Drop and extend our Capstone Budget to $1750.

decisions (3)The final task, which we are still working on, is to narrow our cart.  We started with a cart totaling almost $3000.  We knew that we needed to reduce the cart to about $2200 in order to spend $1750 in cash and use $525 in rewards dollars.  By the time we stopped talking about the math, students were all commenting on how hard this is.  One of them said, “You mean this is just a small part of what you do?”  I love that they keep bringing this up.  I love buying new materials, but I’ve been very honest with them about what a small fraction of my time this actually is.  As always, it was interesting to hear them wrestle with decisions about which books to cut from the list:

  • We have 3 books about drawing horses.  Let’s pick the one with the most horses that people are probably interested in.
  • Three of our war books cost $27.  Let’s pick something that doesn’t cost that much.
  • That book looks like it would only be for 5th graders.  It might scare other kids.  Let’s take it off the list.
  • We can’t buy every Jake Maddox book this time.  Let’s choose a few of them.

decisions (5)Every struggle they were having is the same struggles that I go through alone.  I loved being able to share this frustration with them, and they had a much better understanding of how I use math and decision making in my job.  My only wish is that more students could walk through this process with me.  Each year, I find new ways to involve different groups of students, but I would love to have larger groups of students involved in the math aspect.

decisions (6)Once we get our carts narrowed down, we will place our order and wait for the books to arrive.  Since I have extra Capstone Rewards dollars, I’ll also be able to add in some historical perspective books that I’ve been wanting to get for our many social studies projects.  While we wait, students will think about how to advertise the books to the school.decisions (7)

Problem Solving and Science in Action with the Rube Works App

RubeWorks (2)Back in December, Kate Wright, 2nd grade teacher, told me that the grade level would be studying force, motion, pushes, pulls, and simple machines in the late part of 3rd quarter and they wanted to incorporate the art and inventions of Rube Goldberg.  It was a seed of an idea which I absolutely love.  I love when a seed is planted early enough that it has time to grow and expand with new opportunities.

Over the winter break, I had a follow on Twitter from Electric Eggplant , and in miraculous fashion, the seed idea began to develop.  Electric Eggplant is the developer of a new iPad app called Rube Works.  It’s the official invention game of Rube Goldberg.  I started having a Twitter conversation with them and found out that the app was on sale until the end of December.  I went ahead and purchased 30 copies knowing that it was going to be a perfect fit with the seed of an idea.

My Twitter conversation continued and I was connected with David Fox, the developer of Rube Works.  He agreed that once we got the project going, he would love to connect with us and see what the kids thought of the app.

Since that conversation, a page on Skype in the Classroom has been created for Rube Goldberg which includes the chance to Skype with David as well as Rube Goldberg’s granddaughter, Jennifer.  We added both of these to our growing seed of an idea.

RubeWorks (3)Over the past 2 days, the 2nd grade has been working in the library to use the Rube Works game.  This is a kickoff to their study of force, push, pull, and motion.  We started by watching some videos of Rube Goldberg inventions because most of the students had no idea who he was.  They were fascinated by the zany inventions to do simple, everyday things.  Some of them even launched into a brainstorm of what they would invent (which is coming as a part of our seed of an idea!)

Next, I showed students the Rube Works trailer.

They were eager to get started.  Because the Rube Works app has a reading component that does not have text to speech, the teachers paired students together so that a stronger reader was in each pair.  This helped lift this reading barrier for students, but it also gave students a brainstorming partner.  Students quickly saw that creating a Rube Goldberg invention is not a piece of cake.  It takes trial and error, risk taking, failure, problem solving, perseverance, working through frustration, and creativity to make these inventions work.  In our 35-40 minutes of work time, most pairs managed to finish the first scenario and some made great progress on the 2nd.  A few even made it to the 3rd level.

RubeWorks (5)

Even though there were moments where students could be heard saying, “This is so frustrating!” and “I just can’t get this to work!”, I didn’t see a single group stop working.  I overheard one student say, “I thought first levels were supposed to be easy!”, but she didn’t give up.  When we gathered back on the floor, we talked about how we all get frustrated, but it’s what we do with that frustration that matters.  The teachers brought up a classroom discussion that they have been having with students about perseverance, and this was such a great connection to help them feel what it’s like to persevere through something even when it’s hard. It was so rewarding to students be successful after multiple attempts.

I encouraged students to keep their solutions a secret but to feel free to give one another hints, which is yet another skill that we pulled into this lesson.  We wanted every person to work to figure out these puzzles without someone just giving away the solution.  Students didn’t want to quit after our hour together and they are eager to continue working with this app in their classroom.

When I asked students and teachers about some things that they love, they mentioned things like:

  • clear instructions
  • hints
  • the ability to test your invention multiple times along the way
  • that the app shows you the actual drawing that Rube Goldberg made after you finish a level
  • that it was challenging but fun

We look forward to continuing to explore this app and incorporate what we’ve learned into our own Rube Goldberg inventions.

RubeWorks (6)

A Little Augmented Reality and Zombie Math with 1st Grade

IMG_1842A few weeks ago, Em Smith Headley, 1st grade teacher, asked if I could help with their math standards using the iPads.  They have been working on using a variety of strategies to solve basic addition and subtraction problems.

I pulled together just a few iPad apps for our time together that addressed basic addition and subtraction facts.  I decided to use:

  • Fetch Lunch Rush: an augmented reality app that combines basic addition/subtraction, missing addends, racing, and augmented reality!
  • Math Zombies:  a racing app that gives basic addition/subtraction problems along with double digit math to race against the ever-approaching zombies.  Correct answers knock them out of the way.
  • Candy Count:  a sorting app that allows kids to sort candy by color and then asks several math questions about the candy in each bag.
  • iXL: an app with multiple grade levels which gives standard problems and allows kids to type an answer.

IMG_1846

I had student helpers make a 1st grade math folder on the iPads so that students could easily get to the apps.  We looked at the standard and students brainstormed several strategies that they currently use for solving math problems.  Things such as:

  • number lines
  • draw a picture
  • count up or count back
  • manipulatives
  • etc.

I reminded them that these same strategies come into play when we do math digitally and sometimes the app even provides some strategies for you with hints.  I did not tell students how to play every app because they were perfectly capable of figuring that out on their own.  I spent my time helping students think about strategy and encouraging students to help one another figure out the technical details of how the games worked.  Of course, I helped students who had technical questions, too, but that wasn’t my main focus as the teacher.

Students were bursting with energy during this.  Whether we worked for 25 minutes or 40 minutes, they were extremely focused.  They were free to move in and out of the apps as needed.  We were also able to differentiate for students who needed problems that were more challenging or problems with more basic  features.

At the close, students gave some feedback on what they liked about each app.  Math Zombies and Fetch Lunch Rush was by far the favorite, and they begged to get to do this again in their classroom or the library.


Hour of Code Days 3-5

Day 5 (3)This week has just been incredible.  It’s hard to believe that just a couple of weeks ago the planning for this week began.

Even with lots of benchmark tests and wrapping up the end of the quarter, our Barrow teachers found time to bring students to the library to participate in Hour of Code.

No matter which class came, I saw similar results:  engaged students, problem solving, collaboration, suspension of time, perseverance.  Exposing students to coding has opened up a new world for them.  I loved having a conversation with students during every session about the importance of coding knowledge in their future.  Who knows what jobs will be out there when these students join the workforce, but coding is very likely going to be a part of it.

During the week, our internet has  been extremely slow, which has given us lots of problems.  It hasn’t stopped us though.  We did have to abandon some of the computer programs like Tynker because they just wouldn’t load on our machines.

Kindergarten and 1st grade continued to explore Kodable.  Second grade started exploring Light-bot on the iPad instead of Tynker.  An interesting thing started to happen with these students because they got up out of their seats and acted out the moves that their robot needed to make in order to visualize the code they needed to put in.  I loved watching the strategies that students developed to figure out the code they needed.

Students have recorded some of their thinking using a Fligrid this week, which was yet another new tool to many students.  They loved making these short videos about their learning.

Day 2 (11)A group of third graders along with the whole 4th and 5th grade explored Scratch to make an interactive holiday card.  The 4th and 5th grade groups were huge because the entire grade level came together.  I kept our whole group time very short.  I stressed the importance of not giving up, messing around to see how things work, using tutorials, and collaborating.  It was amazing to watch a group of 75+ students disperse, find their own work spaces, and get to work.  When they figured things out, they shared.  For the 4th grade group, we did a Google Hangout on Air with Sherry Gick (@LibraryFanatic) and her students who were using Blockly.  During the hangout, we each setup a computer and headset and students were able to talk to one another about what they were doing.  I picked up our laptop and walked around our library to show her students what my students were doing.  Sherry got on the microphone several times and helped some of my students with their questions too.  It was a great experiment that I definitely want to try again because it opened up our walls to student-to-student collaboration across states.  I wanted to try the idea of coders on call, and this was a step toward that for the future.  You can see how the conversations turned out in this video:

Next week, we hope to connect students again with Sherry Gick’s students in Indiana and Shannon Miller’s students in Iowa to share some of their learning and creations.  This week has sparked interest in coding, and I’m sure that coding will make its way into many of the collaborative projects during the year.  Thank you Code.org and Computer Science Education Week for putting together such a great program, inspiring videos, and helpful tutorials.  The word is out that coding is a critical skill needed by our students.

Here’s a glimpse of what happened at Barrow this week: