American Symbol Research in Kindergarten

Students in 2 Kindergarten classes have been hard at work researching American symbols as part of their social studies standards. Doing research projects with the youngest learners in our school doesn’t look like it does in the upper grades. We think about what some of the biggest barriers might be for our young creators and put pieces in places to support students in getting over those barriers.

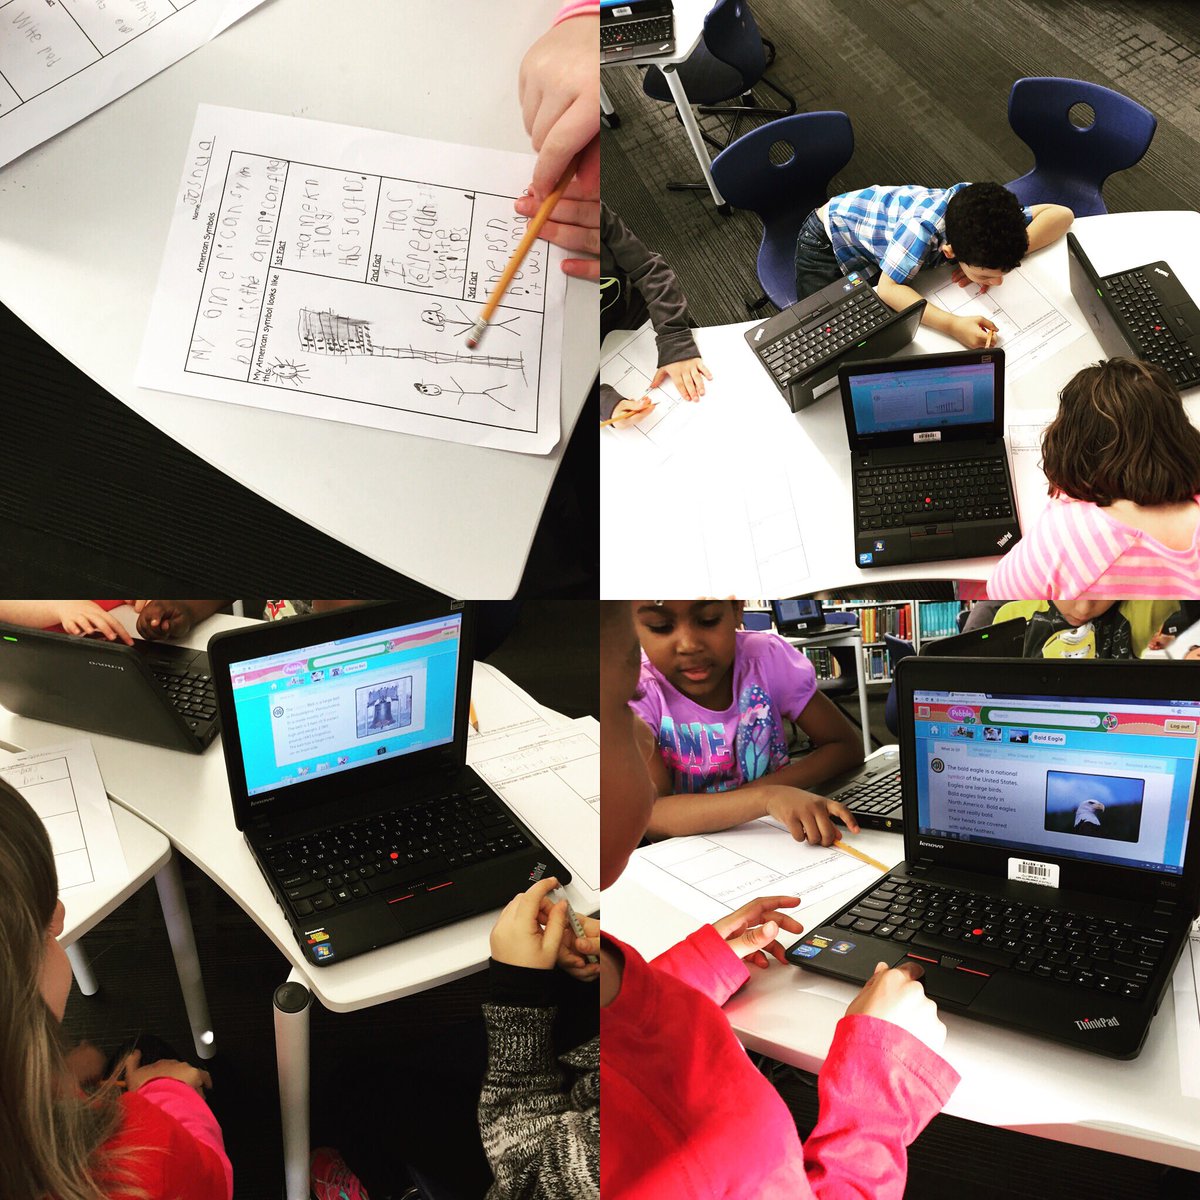
First, students chose one of four American symbols to research: American flag, statue of liberty, liberty bell, and bald eagle.  In the library, we introduced students to a graphic organizer for collecting 3 facts about their chosen symbol. I learned from another Kindergarten teacher a few years ago during research to set an expectation that allows all students to succeed or exceed during the first research session. We asked students to have a goal of writing at least one fact during the first work session, but if they still had time, they should keep going.

research 1

Students used Capstone’s PebbleGo for their research. We love this database for many reasons but mostly because it breaks information down into manageable pieces and reads the text in a human voice for students. I modeled for students how to listen to a portion of the text and then think about what they had learned by listening. Then, we talked about what we would write on our organizer. This modeling was done with a different American symbol than the one students were researching.

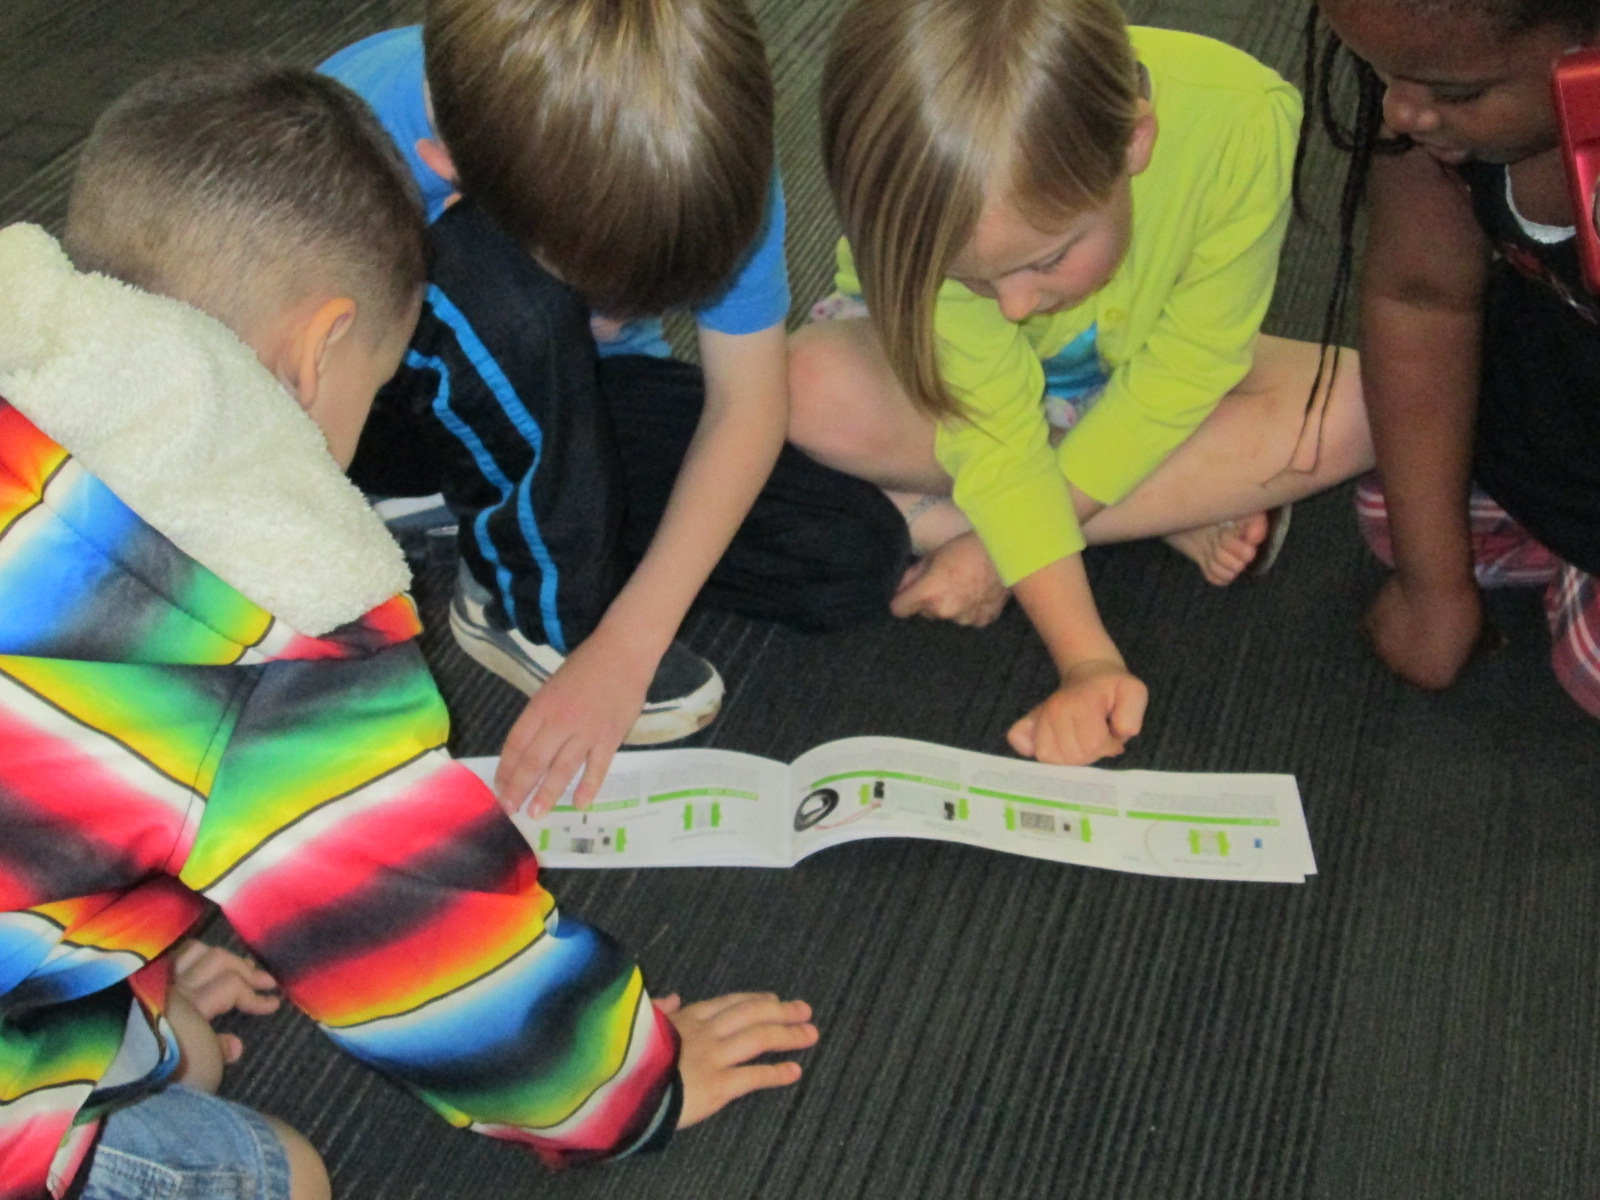
At tables, I setup computers for students to use in pairs. We chose pairs because it gave students one more source of support as they worked. Also at each table, we tried to place an adult for support. The teacher, classroom paraprofessional, and me all worked at tables. If a parent volunteer or student teacher was available, they stayed at the 4th table. Otherwise, the adults took turns checking between tables.  We found that we had to continue modeling for students how to listen, ponder, and then write rather than just copying a sentence off the screen. However, some students still chose a sentence to copy.  All students left with at least one fact but many left with 3 or more.

research 2

After this initial work session, students continued their research in centers in the classroom.  Then, they returned to the library for another work session in small groups. Each group came for 15-20 minutes. We did a short tinkering session with Chatterpix Kids to see how you can take a picture of something, draw a mouth on it, and then record that picture talking. Ahead of time, I chose creative commons images of the symbols for kids to use for their pictures. Rather than having every student create their own Chatterpix, each group created one Chatterpix video with the iPads. Each student chose one fact from their research to read.

Before recording, students chose their fact. We decided the order students would read and practiced a few times. Students helped take the picture of the symbol and draw the mouth. Then, we pressed record and passed the iPad to record. If we needed to record a few times, we did. Then, we uploaded our videos to Youtube and created a playlist to share with the class, families, and you.  I hope you will take a moment to listen to their work.

I love building foundations of research in our early grades and seeing where these students end up by the time they are in 5th grade. We have a lot of work to do, but we celebrate the work of these Kindergarten students and what they have created.

Ms. Lauren’s American Symbols:

Ms. Boyle’s American Symbols:

Kindergarten Green Screen Animal Interviews

animal interview green screen (15)

Ms. Kelly’s Kindergarten class has been hard at work on an animal research project that is unlike any other I’ve been a part of.  For the culmination of the project, students recorded an interview of an animal in its habitat using our green screen and the Do Ink app.  There were many layers to the process that students went through the create their final product. The class has been to the library throughout the project to initiate various pieces and then moved forward with the project work in class.

animal interview green screen (17)

It’s hard to even go back to where the project began, but eventually each student came to be in one of 4 groups researching an animal of interest: crows, sharks, spiders, and alligators. Students checked out both fiction and nonfiction books about their animals in the library during one piece of the project. During another piece, students spent time researching their animals and gathering facts.

animal interview green screen (16)

In another lesson, students came to the library to talk about crafting great interview questions. We looked at the Story Corps great question generator and practiced interviewing one another in a way that would elicit extended responses from the person being interviewed.

Students took this skill and went back to class to write questions that they would ask to their animals if they were doing an interview of the animal they researched.  Using their research, they thought about the answers to their questions.

animal interview green screen (13)

In another session, students came just to learn about how the green screen worked.  We watched a tutorial video from Do Ink as well as a video that had been made on our green screen.

Finally, students came back for one more work session in the library to prep for their interview project. This was a work session because students were in all kinds of stages of their completed project. The teacher, parapro, and I all worked with groups of students at the point they were at. My group was getting close to ready for use of the green screen, so we took some time to experiment a bit with what students hoped to do. Instead of a static picture of the animal’s habitat, students wanted a video of the habitat. We searched creative commons Youtube videos for nature scenes that matched where an animal would be found and used the iPad to record snippets of those videos. This helped us think about what we would need to accomplish before recording.

animal interview green screen (11)


Back in the classroom, students made final preparations for their animal interviews. They made props. They wrote our their script on cue cards and assigned parts to each person in the group.  The teacher made copies of these cards for students to practice with in class as well as sent them home for weekly homework practice.  Students also decided exactly what they hoped to have a video of for the background of the green screen. The teacher sent these to me in advance, so that I could pull some videos from Youtube for us to use.

Each group came individually to the library to record. We did a practice run of the script.  The teacher held the cue cards and I ran the iPad.  I flipped the screen so that students could see themselves as they talked. This helped them know to be in the right place, but it also tempted them to wave at the camera and make faces.

Once students finished recording, they had a chance to watch their video back. I uploaded the videos to Youtube so that we could share them with families and authentic audiences.  I encourage you to take a look at the work.

animal interview green screen (3)

Pulling off Kindergarten projects like this takes some creative thinking. Anytime that we can break the project into pieces, work in small groups rather than the whole group, and do recording within single groups makes the project run much more smoothly. I also love when a project flows in and out of the library and classroom.

animal interview green screen (5)


Ms. Kelly is an awesome teacher to collaborate with because she finds so many connections to the standards students are working on but also weaves in student interest and expertise.  She dives into a project and trusts that along the way she is going to realize just how many standards a project based in student interest and curiosity can actually included. She also thinks about how to reinforce the project so that students are fully prepared before jumping in to creating the final product. I thought it was genius (and time consuming) to create so many cue cards and give students copies to practice for homework.

I’ve been doing several technology computer projects lately, and I’m so thankful for the flexibility of our schedule so that we can get creative with how to break the projects down into pieces as well as smaller groups.  Bravo Kindergarten for another awesome project.


Connecting with Capstone and the PebbleGo Team through Skype

pebblego skype (1)

Our 2nd graders have been thrilled by all of the people voting for their Barrow Peace Prize project.  Voting will continue until February 17th, so there’s still time to take a look at their project and vote.

Today, we were fortunate to have a Skype session with the PebbleGo team at Capstone. PebbleGo is a set of databases with informational text focused on social studies, biographies, science, animals, and dinosaurs. The text is geared to students in lower elementary grades, but it is useful for students at all grades as a starting place for research. Our teachers love the accessibility of the text, how the text is broken into consistent  headings, and that it reads the text to students in a human voice. Our 2nd graders used PebbleGo as the first resource in their Barrow Peace Prize research on Jesse Owen, Bessie Coleman, Ruby Bridges, Charles Drew, Langston Hughes, and Wilma Rudolph.

pebblego skype (5)

During our Skype, we connected with:

  • Tom Zemlin, Director of Software Development
  • Rachel Wallwork & Stephanie Miller, Senior Product Planning Managers
  • Amy Cox, Director of Library Marketing

pebblego skype (8)

Before our session, we sent some questions to PebbleGo and they sent some questions to us.

For PebbleGo:

  • How are PebbleGo articles written?
  • What do you know about the number of people who use PebbleGo?
  • How do you decide what topics to include in PebbleGo?

For us, the Capstone team asked in advance:

  • What do you like about PebbleGo?
  • What do you wish were different?
  • What seems to be missing or what did you have trouble finding the answer to?

We opened our Skype by giving an update on the statistics from our Barrow Peace Prize Projects. At the time of our Skype, our work had been viewed in 121 different locations around the world, according to our Smore page.

The Capstone team introduced themselves and then launched into telling students the process that the team goes through to decide on and create articles. We learned that PebbleGo has been used by over 260,000,000 students around the world.

pebblego skype (4)

Our students took turns lining up at the computer to offer answers to the questions from Capstone, and those comments and questions sparked additional conversation.

Our students expressed their love for how PebbleGo reads to them, has videos, is broken up into sections, and has info on lots of people.

Some of the wishes they had were to have a comprehension check at the end of an article and to include information on character traits for the people in biographies. The character trait comment launched an additional conversation with the Capstone team. We told them how our social studies curriculum includes a study of character traits woven into the people in history. This was hard for our research because we felt like character traits were a bit of an opinion based on facts. The Capstone team had great wonderings for us. They wanted to know if we thought character traits should be separate articles in PebbleGo or if they should be embedded in the biography articles. Our students overwhelmingly responded that they wanted them embedded.

pebblego skype (3)

This then took us to the question about what Capstone does with all of the wishes that it gets from its users. We learned about how they keep lists of wishes and start to notice patterns of requests. When something is requested enough, it might be put into PebbleGo or it might even come up for a vote from PebbleGo users. Within this conversation, we learned that it takes several months for an article to go from an idea to the final piece we see in PebbleGo and the work happens in multiple locations including New York and India.

I loved how the Capstone team listened to our students and how flexible the conversation was with over 100 students. We were well prepared with our student comments and questions, but there was plenty of space to find tangents that revealed more information for our students.

One of the things that I heard from Capstone is that they go through the same kind of research that we are asking our students to go through. They gather their information from multiple sources, create many drafts, and review their work before it is sent out to an audience. It was important for our students to hear this from a major company and see the connections to what we are doing in school.

pebblego skype (7)

Thank you so much to Amy Cox and the Capstone team for making this Skype happen for our students today. It was a wonderful addition to a project that has meant a lot to our students.

Preparing and Reflecting on Our Immigration Simulation Via Flipgrid

immigration simulation (1)

Each year, our 5th grade studies immigration and Ellis Island as a part of their social studies standards. For these standards, the teachers work together to prepare students for an Ellis Island simulation experience that takes place across the first half of a school day. A lot of preparation goes into this event, and I’m excited that the library was able to be a part of the project.

immigration simulation (5) immigration simulation (4)

Before the actual simulation, each student was assigned an immigrant to become for the day. They received a folder with a short description of where their person was coming from, what he/she was bringing, and possibly a bit about why this person was traveling to America. This was all prepared by the Social Studies teacher, Ms. Olin.

immigration simulation (10) immigration simulation (8)

The teachers and I shared a Google Doc where we started putting links to sites that we thought would be helpful for students as they researched the immigrant experience for immigrants coming to America from their assigned country. I took these links and made a research Symbaloo for students to use.

In the library, I introduced students to this Symbaloo and they each received their folder from Ms. Olin. The Symbaloo link was shared with all students in Google Classroom so that they could easily find it again. In addition to a few details about the immigrant, the folder contained a graphic organizer with some details that students needed to gather in order to construct a letter of introduction for Ellis Island. Students used the organizer and Symbaloo for an hour in the library and then continued their research in social studies and language arts.

immigration simulation (15) immigration simulation (4)

In writing, students constructed their letters of introduction and Ms. Olin printed a copy of each letter to put in student folders. Students returned to the library a couple of days before the simulation. They had time to finish letters, and when they were ready, they  used Flipgrid to practice reading their letters. In the past, we’ve found that some students were a bit nervous on the day of the simulation or took some time to get into their character. Our hope was that the Flipgrid would give students a chance to get comfortable with their character and practice speaking from that perspective before being thrown into the simulation. The Flipgrid also gave them a chance to listen to one another’s stories and research since they don’t have a lot of time to do that on the simulation day.

Here’s a look at how their practice turned out:

On the day of the simulation students rotated through many experiences to take on the role of an immigrant coming to America. Many dressed in costume, carried props, and practiced talking in an accent. They carried their folders that we had worked on throughout the project. Parent and community volunteers came in to help lead the stations so that students were able to go through health inspections, written tests, and legal inspections. Many were questioned multiple times about their health or documents. Many students were sent away to search for missing pieces of their documentation or were held in quarantine for various reasons.

When students finally passed through all of the experiences, they took an oath and had a meager celebration of bread and cheese. During this time of eating, students once again used Flipgrid. We brought them back into this century and asked them to think about their experience. They didn’t have a script for this. We just wanted their initial reaction after completing the simulation. There are some interesting stories of how it felt to be questioned so much or be detained.  You can see their reactions here.

The addition of Flipgrid this  year really helped to prepare students for the simulation, to learn from one another’s stories, and also for us to hear a student perspective of going through the simulation that we might not normally here. Each student had a chance to share his/her voice and many spoke up when they might not have spoken up in front of the whole class.  I keep thinking of new ways to use Flipgrid in my teaching. I love how versatile it is and want to continue to push the limits of how the tool is used.

Beginning the Barrow Peace Prize: A Flipgrid Project

peace prize research (5)

Each year, our 2nd grade takes on a big research project that has evolved into a project called the Barrow Peace Prize. Students research one of six people from black history, write a persuasive piece convincing people to vote for their person to win, and record their writing using Flipgrid. These videos are shared with the world along with a Google forms voting ballot. We celebrate the winner with the Flipgrid team via Skype.

peace prize research (9)

This year’s project is off to a great start, and I’m amazed by what these 2nd graders are doing with their technology, especially since they aren’t 1:1 in their classes.  With fewer devices to practice on, it takes these students a bit longer to navigate tools on the computer.

peace prize research (8)

To start, each student chose one of six people: Langston Hughes, Wilma Rudolph, Bessie Coleman, Jesse Owens, Charles Drew, and Ruby Bridges. Using Google Classroom, each teacher shared a Google doc graphic organizer with students. In the library, students brought class computers and I provided additional computers so each student had one. We did a review of how to login to Google and navigate to Classroom to get the doc. I also showed students how to click between tabs in Chrome, how to copy and paste facts, and where to look for information.

peace prize research (7)

Students started in 2 resources: PebbleGo and Encyclopedia Britannica. I love these sites because they have great information and both will read the content to students who need that extra support. I debated about teaching students how to copy and paste because I don’t want to set students up for just copying. However, we wanted students to have access to a collection of the best facts when they prepared to do their writing without having to weed through all of the articles. The writing workshop time would be the time to focus on taking those copied facts and put them into students’ own words.

peace prize research (6)

We did 3 hour-long sessions of research. Each session we saw students get more proficient at navigating the technology, and even in the frustration we faced, I reminded myself and the teachers to step back and really look at what 7-year olds were doing. Students were logging into email, accessing Google Classroom, finding a Google doc, visiting multiple resources, using ctrl C and ctrl V, keeping track of where facts came from, and leaning to use the research tool in a Google Doc. This list could definitely be added to because there was a lot more.

Once facts were gathered, teachers began writing workshops in their classrooms for students to start writing scripts for their videos. Prior to this, we held a Google Hangout where all classes tuned in from classrooms. The purpose of this was to establish a list of character traits that someone who is deserving of the Barrow Peace Prize might represent. We read about Alfred Nobel and looked at Malala and why she represented peace. Then, classes added to a Google Doc to create a list of these character traits. This list was displayed during writing times for all students to consider in their writing.

Now, students are continuing to fine tune their writing before recording takes place.  We can’t wait to share the videos with our school, families, and classrooms around the world.  Be on the lookout for a post in the next couple of weeks inviting you to view and vote for the 2016 Barrow Peace Prize.

peace prize research (2)

Using Makerspace to Extend Curriculum: A Geology Project

tinkercad rock walls (12)

Third grade studies rocks and minerals as a part of their science standards. In Ms. Hicks class, they have been extending their research of rocks and minerals to create their own Blendspace lessons to teach others facts about rocks and minerals. They are even including pre-tests and post-tests in their lessons. As a part of this Blendspace project, students started thinking about how they might design their own climbing wall for our school based on their research.

tinkercad rock walls (11)

Ms. Hicks asked me what tool we might use to design and prototype of a climbing wall, and I immediately thought of Tinkercad. We have used Tinkercad for other projects and have found it to be one of the better tools for 3d design at the elementary level. Students came to the library to learn a bit about how Tinkercad works.

tinkercad rock walls (10)

I gave them a very quick tutorial which basically showed them things like adding a work plane, dragging over geometric shapes, resizing shapes, and building up.

tinkercad rock walls (8)

I created two generic accounts that students share rather than creating an account for every student. Half of them logged in with one account and half with the other. Their goal was to tinker during the first lesson to see what they could figure out, but their tinkering was a bit more focused than usual. Ms. Hicks really wanted them to already start envisioning their climbing wall as they were tinkering. Some of them latched onto the tool and really got a jumpstart on designing, while others tried something and started over several times.

tinkercad rock walls (7)

One student thought we was being a bit silly by trying to design a chicken instead of a climbing wall, but we turned this into a learning opportunity. I thought about the climbing wall that is at our own Omni Club here in Athens. It is shaped like a giant bulldog, so I pulled it up on the screen to show that he could in fact design his rock all to look like a chicken if he really thought about how people would climb a giant chicken. Instead of shutting him down, his wheels were turning about what he might try, and he is in fact now designing a penguin rock wall.

Other students started thinking about which rocks and minerals would be the best choices for the climbing wall based on their strength and also their color. They referenced their research and the Mohs hardness scale to choose rocks and minerals that would hold up a climber. As they did this, they changed the colors and shapes of the climbing pieces on their walls to represent their different choices. Not all students were ready for this level of thinking, but when we found students who were thinking in this way, we encouraged them to share what they were doing in the hopes of giving other students ideas.


One student even let me record a snippet of his thinking about his own rock wall choices.

The students have worked on these designs for 3 work sessions. As they finish, they are taking screen shots of their designs and adding them to Blendspace with an explanation of their design. In the future, we plan to export their designs as .stl files so that we can actually 3d print their prototypes when they are ready to present.

tinkercad rock walls (1)

I loved this real world application of rocks and minerals because it showed students that there are actually careers where you might consider some of the facts that they are learning in science. There was so much higher order thinking built into this project, especially this design piece. I had some great conversation with students as they referenced their research to find the specific rocks and minerals they wanted to use. One conversation involved a student specifically wanting a rock that was yellow. He kept Googling different rocks he knew to see if they came in yellow. When he finally found one of the feldspar family that was yellow, he noticed that the website description referenced Bob’s Rock Shop. We had a great conversation about the importance of digging into the website to really see where the information was coming from, and he found that the information actually did come from a reliable source within that site.

tinkercad rock walls (6)

I hope that we can find ways to share the work that this class is doing in the hopes of inspiring students at all levels to apply what they are doing to really world experiences. It would be fascinating to actually see this climbing wall come to life and have o

A Year-Long Kindergarten Interdisciplinary Space Project

hocking makerspace exploration (6)

I have to take a moment to brag on another teacher and group of students in our school.  Kelly Hocking is an amazing Kindergarten teacher, and she has a talented group of Kindergarten students who are some of the biggest researchers and creators in our school.  I love how each year she finds something that her class takes an interest in and somehow weaves into every subject area and standard that they study in Kindergarten.  One year it was art.  Another year it was a study of maps and stretching the imagination.  This year it was space.

Kelly never knows at what point in the year something will pop up as an interest in her class, but this year it happened when they were doing a GoNoodle.  It happened to feature space, and it took the class into a series of questions and wonderings about space.

They started reading lots of books about space as well as studying the science standards about the day and night sky.

The more they read, the more they started to notice about space popping up in so many areas of their curriculum and life.

They launched into research mode and asked lots of questions.  In the library and classroom they used print and digital resources to learn about the planets and collect facts about each one.

In February, the class celebrated Fat Tuesday by dressing as planets and parading around the school.  Each costume was space-inspired and they handed out coins and beads to lots of classes.

Research continued in the classroom and the media center.  Students used all of their facts to write a series of notes.  In groups, the students put those notes in an order that made sense and prepared to make their own ebooks about space using the Storykit app.

At this point, we were approaching poetry month, so I suggested that the students think about space poetry.  I connected the class with several poetry books about space, and they started crafting some poems in class.  Ms. Kelly also has ukuleles in her classrooms, so the poems eventually were turned into songs with music composed by the students.

At our annual Poem In Your Pocket day, the groups of students performed their poetry songs for a live audience.  We even had poet, Laura Purdie Salas, listen in to the poetry since students were inspired by her space poems and songs.

At this point in the year, lots of attention turned to Mars and space exploration.  Students really didn’t want to travel to Mars themselves, but they did want to think about helping other people get there some day.  We created a Padlet to collect all of our research in the library and the classroom.

Eventually, the students wanted to start making some inventions to help Mars explorers, so we did a lot of tinkering in our Makerspace.  In class, students constructed elaborate prototypes of their inventions and did informational writing to accompany their creations.

If we had more time in our year, I’m sure Ms. Kelly and her students would have come up with even more miraculous things, but it truly was an amazing year of exploration and I’m glad that our library was a part of it.

hocking makerspace exploration (11)

You can read more about the library parts of this project in these posts:

Why Do We Explore Space: A Virtual Field Trip Opportunity

Can a Foodini 3D Printer Go to Space?

Kindergarten Mission to Mars: A Makerspace Exploration

Kindergarten Researchers in Action

Also, you can view Ms. Kelly’s full deck of slides which includes lyrics to a cumulative song that explores all of the planets and the facts the students learned.  They performed this song at our end of the year assembly.

View the full slidedeck here.

Why Do We Explore Space?: A Virtual Field Trip Opportunity

Ms. Kelly’s Kindergarten class has just amazed me across this year by how they have used a study of space to flow into so many of their standards.  They have written their own ebooks, composed music, written lyrics, researched multiple questions, and now they are coming up with a plan to help the people who want to go on a one way trip to Mars.  During the course of this study, an interesting question came up.  Why do we explore space in the first place?  It’s something we haven’t even considered during all of our research.

It came about because of an email that Ms. Kelly got about a virtual field trip to NASA’s Goddard Space Flight Center.

30 minute virtual field trip begins at 1:00 PM (ET) and is appropriate for all grades. Get a tour of a NASA facility and learn about the research being carried out into planetary exploration. Learn why it is important to explore the universe and how our knowledge of the universe has expanded due to the space programs. Understand the multitude of scientific practices involved in space travel, and see the application of many of these in the real world.

The virtual field trip is next Friday May 1, 2015 at 1PM EST.  It’s appropriate for all grade levels and it’s free!  All you have to do is register and you can even have students submit questions ahead of time.  http://www.discoveryeducation.com/Live/of-the-people-space-day-2015.cfm

Ms. Kelly wondered if we might explore the idea of space exploration a bit before students engage in the virtual trip.  I’m brainstorming about this right now, but I first wondered about putting the question out to more people.  I wonder what all of us think about why we should explore space or even why we shouldn’t.  I decided to make a Flipgrid.  Anyone can post a 90 second to this grid responding why we should or shouldn’t explore space.  I would love to have kid voices and adult voices from multiple perspectives to share with this Kindergarten class.

If you have a moment, reflect on the question and make a video.  If you have even more time, do this with your own students in the next few days.  If you don’t have time to make a video, consider sharing it with someone who might.

Why should we explore space? (or not explore space)

My thinking at the moment is that I will share these videos with my Kindergarten students as an opener.  We’ll take time to read some books such as The Planet Hunter or Moustronaut and reflect on the question ourselves.  Then, students will have a chance to add their own ideas to the grid along with the other voices.  http://flipgrid.com/#c6c0c1f0

Ms. Kelly and I never know where we are going to end up.  We just keep our minds open, look for opportunities, and give it a shot.  We usually find that our risk-taking leads to some miraculous opportunities for our students.


Kindergarten Mission to Mars: A Makerspace Tinkering Lesson

hocking makerspace exploration (15)

Ms. Kelly’s Kindergarten class has turned a curiosity into a year-long project.  They became interested in space, and it has turned into a research project about planets, creating planet ebooks, writing original songs about the planets using ukuleles, and having a Fat Tuesday parade dressed as the planets.

Now, these students are on a mission to figure out how to support human travel to Mars.  They don’t actually want to go to Mars themselves, but they want to think about what might need to be invented in order to support human travel to Mars in the future.  Wow!  Some might look at a Kindergarten class and think this is silly.  How could students as young as Kindergarten come up with ideas for traveling to Mars?  I think Ms. Kelly’s class proves that even our youngest voices should not only be listened to but empowered as well.

Mars Makers

These students have spent extensive time researching Mars.  They know about the land, the weather, the atmosphere, and ways that Mars has already been explored.  They have brainstormed things that they might need to think about when traveling to Mars such as water, food, oxygen, and how to survive the dust storms.

They recently came to the library to read the book  You Are the First Kid on Mars by Patrick O’Brien.

She and I brainstorm a lot over email.  When working with her, nothing is impossible and our biggest limit is time.  She wanted a way to capture all of her students’ brainstorming, so I suggested a Padlet since they could post ideas, websites, pictures, and files.  I set one up for her and they got to work adding to it.

Within their brainstorming, they talked about creating robots that could help them explore Mars as well as several other technology-heavy ideas.  This brainstorm naturally brought us to our library makerspace.  We wanted students to have a time to explore some facts about robots, technology, electricity, circuitry, energy, and space exploration.  Ms. Kelly books an hour of time for student to explore, and I created some experiences for them to move through.

Experience 1:

I pulled as many books as I could find on all of our major maker concepts from 3d printing to robotics to circuitry.  I also pulled books about space.  This experience was a time for them to look at lots of pictures, read captions, and skim text with one another and an adult to get ideas that they hadn’t even thought of in their brainstorm.

Experience 2:

We have several robotics options in our makerspace.  Since robotics was part of their brainstorm, I wanted them to tinker with a robot that was manageable by a Kindergarten student.  I chose Sphero.  Since Sphero alone couldn’t do some of the things they were thinking of robots doing, I showed them a Youtube video of how Sphero can be combined with other things like a chariot to pull a camera or add an attachment.

Then, students used the Drive app to practice driving Sphero and brainstorming how this might help them explore Mars.

Experience 3:

Students have talked a lot about wiring and circuits during their brainstorming.  They really want to wire something that could actually work. I have 2 littleBits space kits which have instructions for creating things like Mars Rovers, Grapplers, and Data Collection Tools.  The age range is high for these kits, but age range never stops us from trying something.  We just look at what barriers are in place and then figure out how to build a bridge.  For this experience, I started students with the instruction booklets.  They got into 2 smaller groups and looked at the diagrams, instructions, and functions.  They started to think about their brainstorm and how these littleBits inventions might work with their ideas.  Then, they moved to a table of littleBits.  In pairs, they used a battery, power cord, and blue power switch to connect to one input (pink) and one output (green).  The idea was just to start tinkering a bit with littleBits to see how they work.  They weren’t necessarily making a space invention yet.

Here’s a quick look at what it all looked and sounded like:

Next, our students will go back into their classroom and continue working on their padlet using the ideas from the makerspace exploration and the books.  They also checked out some of the books to take back.  Then, students will begin constructing prototypes of tools that they might actually invent for space.


Social Studies Character Traits: Historical Figures and Personal Connections

IMG_4902This year our school has been creating space for vertical alignment meetings for each subject area.  In these meetings, a representative from each grade level talks about the standards for each quarter and we start to look for ways that we might collaborate across grade levels or move curriculum around the better serve our students.  One of the conversations that keeps coming up in the social studies meeting is character traits and historical figures.  Every grade has a list of historical figures that they have to cover along with a list of character traits that each person represents.  Students really have to understand both the historical figure and the character trait in order to connect the two.  We’ve discussed looking for themes in character traits across the school curriculum so that we might feature specific traits each month with both historical figures, current figures, and ourselves.

IMG_4901

Third grade just tried something new with their standards.  They learn about Mary Mcleod Bethune, Susan B. Anthony, and Frederick Douglass and how these figures demonstrate leadership, diligence, cooperation, and courage.  Wow!  That’s a lot to understand.  I love how the 3rd grade approached this.  They spent two weeks  really going in depth with each historical figure.  They read informational text, used the PebbleGo database, and other online resources to know the main contributions of each historical figure.  Along the way, students gathered facts about each historical figure.

IMG_4906

They also spent time learning about diligence, leadership, courage, and cooperation. With these traits, they tried to think of real world examples of how each trait was used.

In the library, each class came for a 45 minute session to comb through all of the facts collected through the lens of a character trait.  Each student chose one character trait to focus on.  The goal was to look back through all of the facts about Susan B. Anthony, Mary Mcleod Bethune, and Frederick Douglass and pull out the facts that demonstrated that character trait.

To setup this time, I modeled the process by using another historical figure that wasn’t part of the social studies unit: Martin Luther King Jr.  We quickly reviewed the 4 character traits.  I thought students would better be able to pull out facts that demonstrated a character trait if they first had a personal connection to the trait.  I told a personal story about how I had shown courage.  When I was in high school, I was terrified of public speaking to the point that I would shake uncontrollably and get sick to my stomach.  By using courage, I have not eliminated this fear from my life, but I’ve learned to control it and now speak in front of many different groups of people.

After telling this personal story, we looked through lists of facts about Martin Luther King Jr and tried to pull out facts that matched each of the character traits.  Students turned to partners and talked about which facts matched which traits and why.

Then, students moved to tables and began their writing time by reflecting on themselves and their chosen character traits.  The teachers and I circulated to talk with students about this.  Then, they went through each of the 3 historical figures and pulled out facts that matched that character trait.

Back in class, students continued working on this process and then crafted their chosen facts into a script where they could explain how each of the historical figures demonstrated the chosen character trait.

Students returned to the library for 10-minute recording sessions.  They used Flipgrid to capture their thoughts.

I think that this was a big step toward thinking about how to make character traits and historical figures connect with our students’ worlds today.  I think we have more work to do, but I love that a new process has started.

I invite you to listen to all of the incredible 3rd grade videos about courage, diligence, leadership, and cooperation.

Leadership

Diligence

Courage

Cooperation